
Transforming dried chickpeas from hard and dusty to golden, shattering-crisp snacks is one of the most rewarding air fryer projects for home cooks. The secret lies not just in heat, but in moisture control and a dry coating that adheres properly to the legume’s surface.
Why This Method Works
Dried chickpeas require significant time to rehydrate and cook through. By roasting them first until tender, then tossing them in a thin layer of oil and flour-based coating before a final high-heat blast, you create a barrier that traps steam inside while allowing the exterior to dehydrate rapidly. The smoked paprika adds depth without needing heavy spices, creating a balanced savory profile.
This approach solves the common problem of soggy roasted chickpeas. Unlike fresh chickpeas which can be tossed and cooked immediately, dried varieties must undergo a two-stage process: rehydration/roasting followed by crisping. The result is a snack that mimics the texture of fried snacks but with significantly less oil.
Recipe Overview
Yield: Approximately 4 cups of finished chickpeas (serves 4 as a side, or 2 large appetizers).
Total Time: About 1 hour and 15 minutes (including soaking time if using dried beans).
Notes on Timing: If you are starting with dried chickpeas from the pantry, you must soak them overnight (8–12 hours) to soften. The active cooking time for the recipe below assumes you have already cooked or purchased pre-cooked canned chickpeas. If using canned chickpeas, skip the initial roasting step and go straight to coating and final frying.
Equipment Requirements
- Air Fryer with a capacity of at least 4–6 quarts (essential for fitting multiple batches without overcrowding).
- A large mixing bowl.
- A fine-mesh sieve or cheesecloth (for rinsing).
- A standard baking sheet (optional, for the initial roast if starting from dried).
Ingredients
Base Legumes:
- Canned chickpeas, drained and rinsed: 3 cans (approximately 700g / 1.5 lbs total weight).
- Dried chickpeas: 400g (requires overnight soaking; see notes below).
Coating Base:
- All-purpose flour: 60g.
- Powdered sugar: 15g (helps with caramelization and crunch).
Flavor Profile:
- Extra-virgin olive oil: 45ml (approx. 3 tablespoons).
- Smoked paprika: 12g.
- Salt: 8g.
- Garlic powder: 6g.
Optional Add-ins:
- Cumin seeds: 5g (toasted lightly).
- Dried oregano: 4g.
Instructions
- Preparation (Canned vs. Dried): If using canned chickpeas, drain them thoroughly and rinse under cold water to remove excess starch. If using dried chickpeas, ensure they have been soaked overnight and drained completely. The goal is for the chickpeas to be soft but not mushy.
- The First Roast (Moisture Control): Spread the chickpeas in a single layer on a baking sheet or air fryer basket (if your model allows direct placement of dried beans). Roast at 375°F (190°C) for 20–25 minutes. Do not overcook this step; you want them to be tender-crisp, not burnt.
- Preheat the Air Fryer: Set your air fryer to 400°F (200°C). Preheating for 3 minutes ensures immediate crisping when the coated chickpeas hit the basket.
- Create the Coating: In a large bowl, whisk together the flour, powdered sugar, olive oil, smoked paprika, salt, and garlic powder. Mix until well combined. If using cumin or oregano, add them now.
- Toss to Coat: Add the warm (not hot) roasted chickpeas to the dry ingredient mixture. Toss gently but thoroughly for 2–3 minutes. The coating should be thin and even; if it looks too thick, add a teaspoon more oil or flour to adjust.
- Air Fryer Cooking: Load the coated chickpeas into the air fryer basket in a single layer. Do not overcrowd; cook in batches if necessary. Air fry at 400°F (200°C) for 12–15 minutes.
- Shake and Monitor: Open the basket halfway through cooking and shake it vigorously to redistribute the chickpeas. This prevents uneven browning and steaming from trapped moisture.
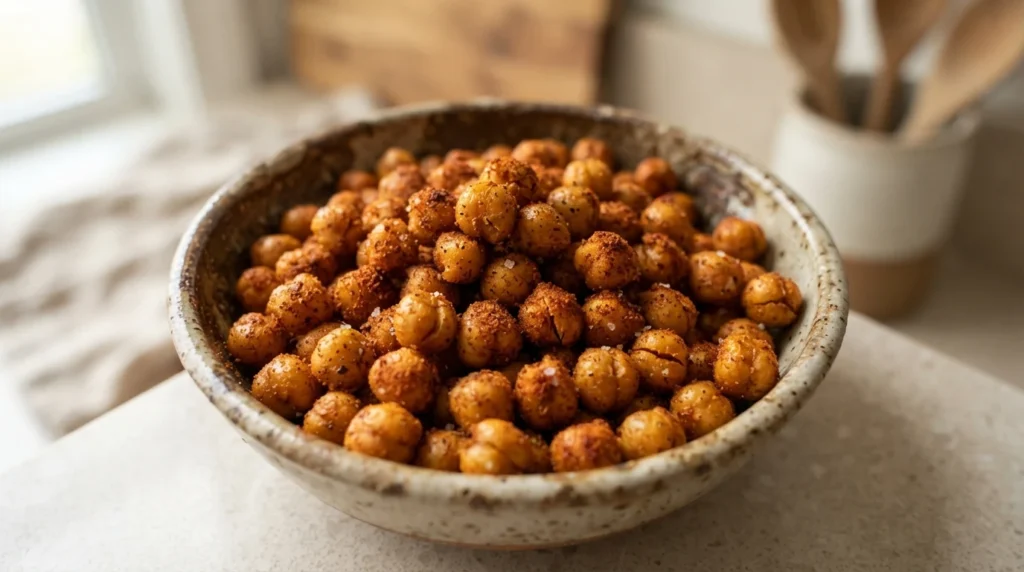
- Check Doneness: The chickpeas are done when they sound hollow when tapped and have a deep golden-brown color. They should be crisp enough to break easily with a pinch.
Troubleshooting Common Issues
- Soggy Texture: If the chickpeas remain soft after cooking, they likely were not dried thoroughly before coating or were overcrowded in the basket. Ensure all excess moisture is removed before tossing.
- Burnt Edges: Smoked paprika can burn quickly at high heat. If you see darkening on the edges too soon, reduce the temperature to 375°F (190°C) and extend the cooking time by 2–3 minutes.
- Lack of Crunch: This is often due to insufficient drying of the chickpeas before frying. If starting from canned, ensure they are completely drained and rinsed.
Substitutions and Variations
You can substitute regular paprika for smoked paprika if that flavor profile suits your recipe better, though the color may differ slightly. For a spicy kick, add 3g of cayenne pepper to the dry mix. If you prefer a different base legume, chickpeas work best due to their shape, but this method can be adapted for roasted peanuts or lentils with minor timing adjustments.
Serving and Storage
These chickpeas are best served immediately after cooking while hot and crisp. They pair excellently with hummus, as a side to grilled meats, or as a crunchy topping for salads and grain bowls. Once cooled, they will retain some crunch but may soften slightly over time.
To store leftovers, allow them to cool completely on a wire rack in a single layer to prevent condensation. Store in an airtight container at room temperature for up to 3 days or refrigerate for up to a week. Reheat in the air fryer at 375°F (190°C) for 3–4 minutes to restore optimal texture.
Frequently Asked Questions
Can I cook these from frozen?
No, frozen chickpeas are typically pre-cooked and may contain excess moisture that prevents proper crisping. They should be thawed, dried thoroughly, and treated according to the canned method.
How do I know when they are safe to eat?
Since these are cooked legumes, ensure the internal temperature reaches at least 165°F (74°C) if holding them for extended periods. For immediate consumption, visual cues of golden-brown color and hollow sound indicate doneness.
Can I make these gluten-free?
Yes, by substituting the all-purpose flour with a 1:1 gluten-free baking blend or almond flour, though the texture may vary slightly due to different absorption rates.