3.3 C
New York
Wednesday, March 4, 2026

Buy now

spot_img
Home Blog Page 39

How the WordPress Admin Panel Works: Full Guide for Beginners

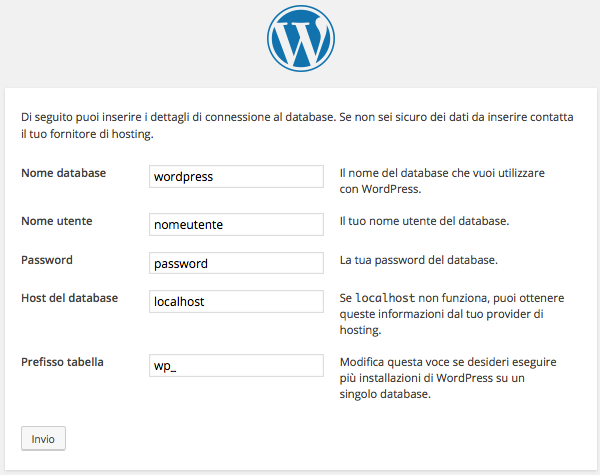
In a standard installation, you access the WordPress administration panel from the address:

http://example.com/wp-admin

However, it is possible to install WordPress in a directory other than the root, in which case the administration panel is accessible from the subfolder address:

http://example.com/wordpress/wp-admin
 

Figura 1. Dashboard WordPress.
WordPress Dashboard

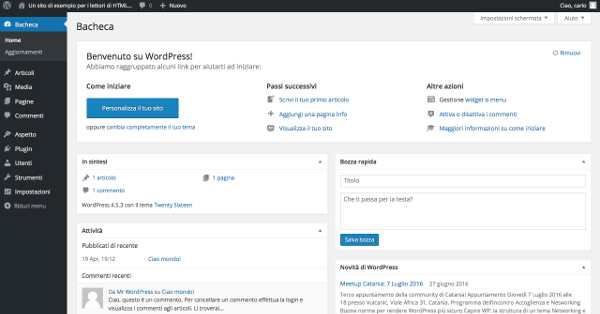
The WordPress Dashboard

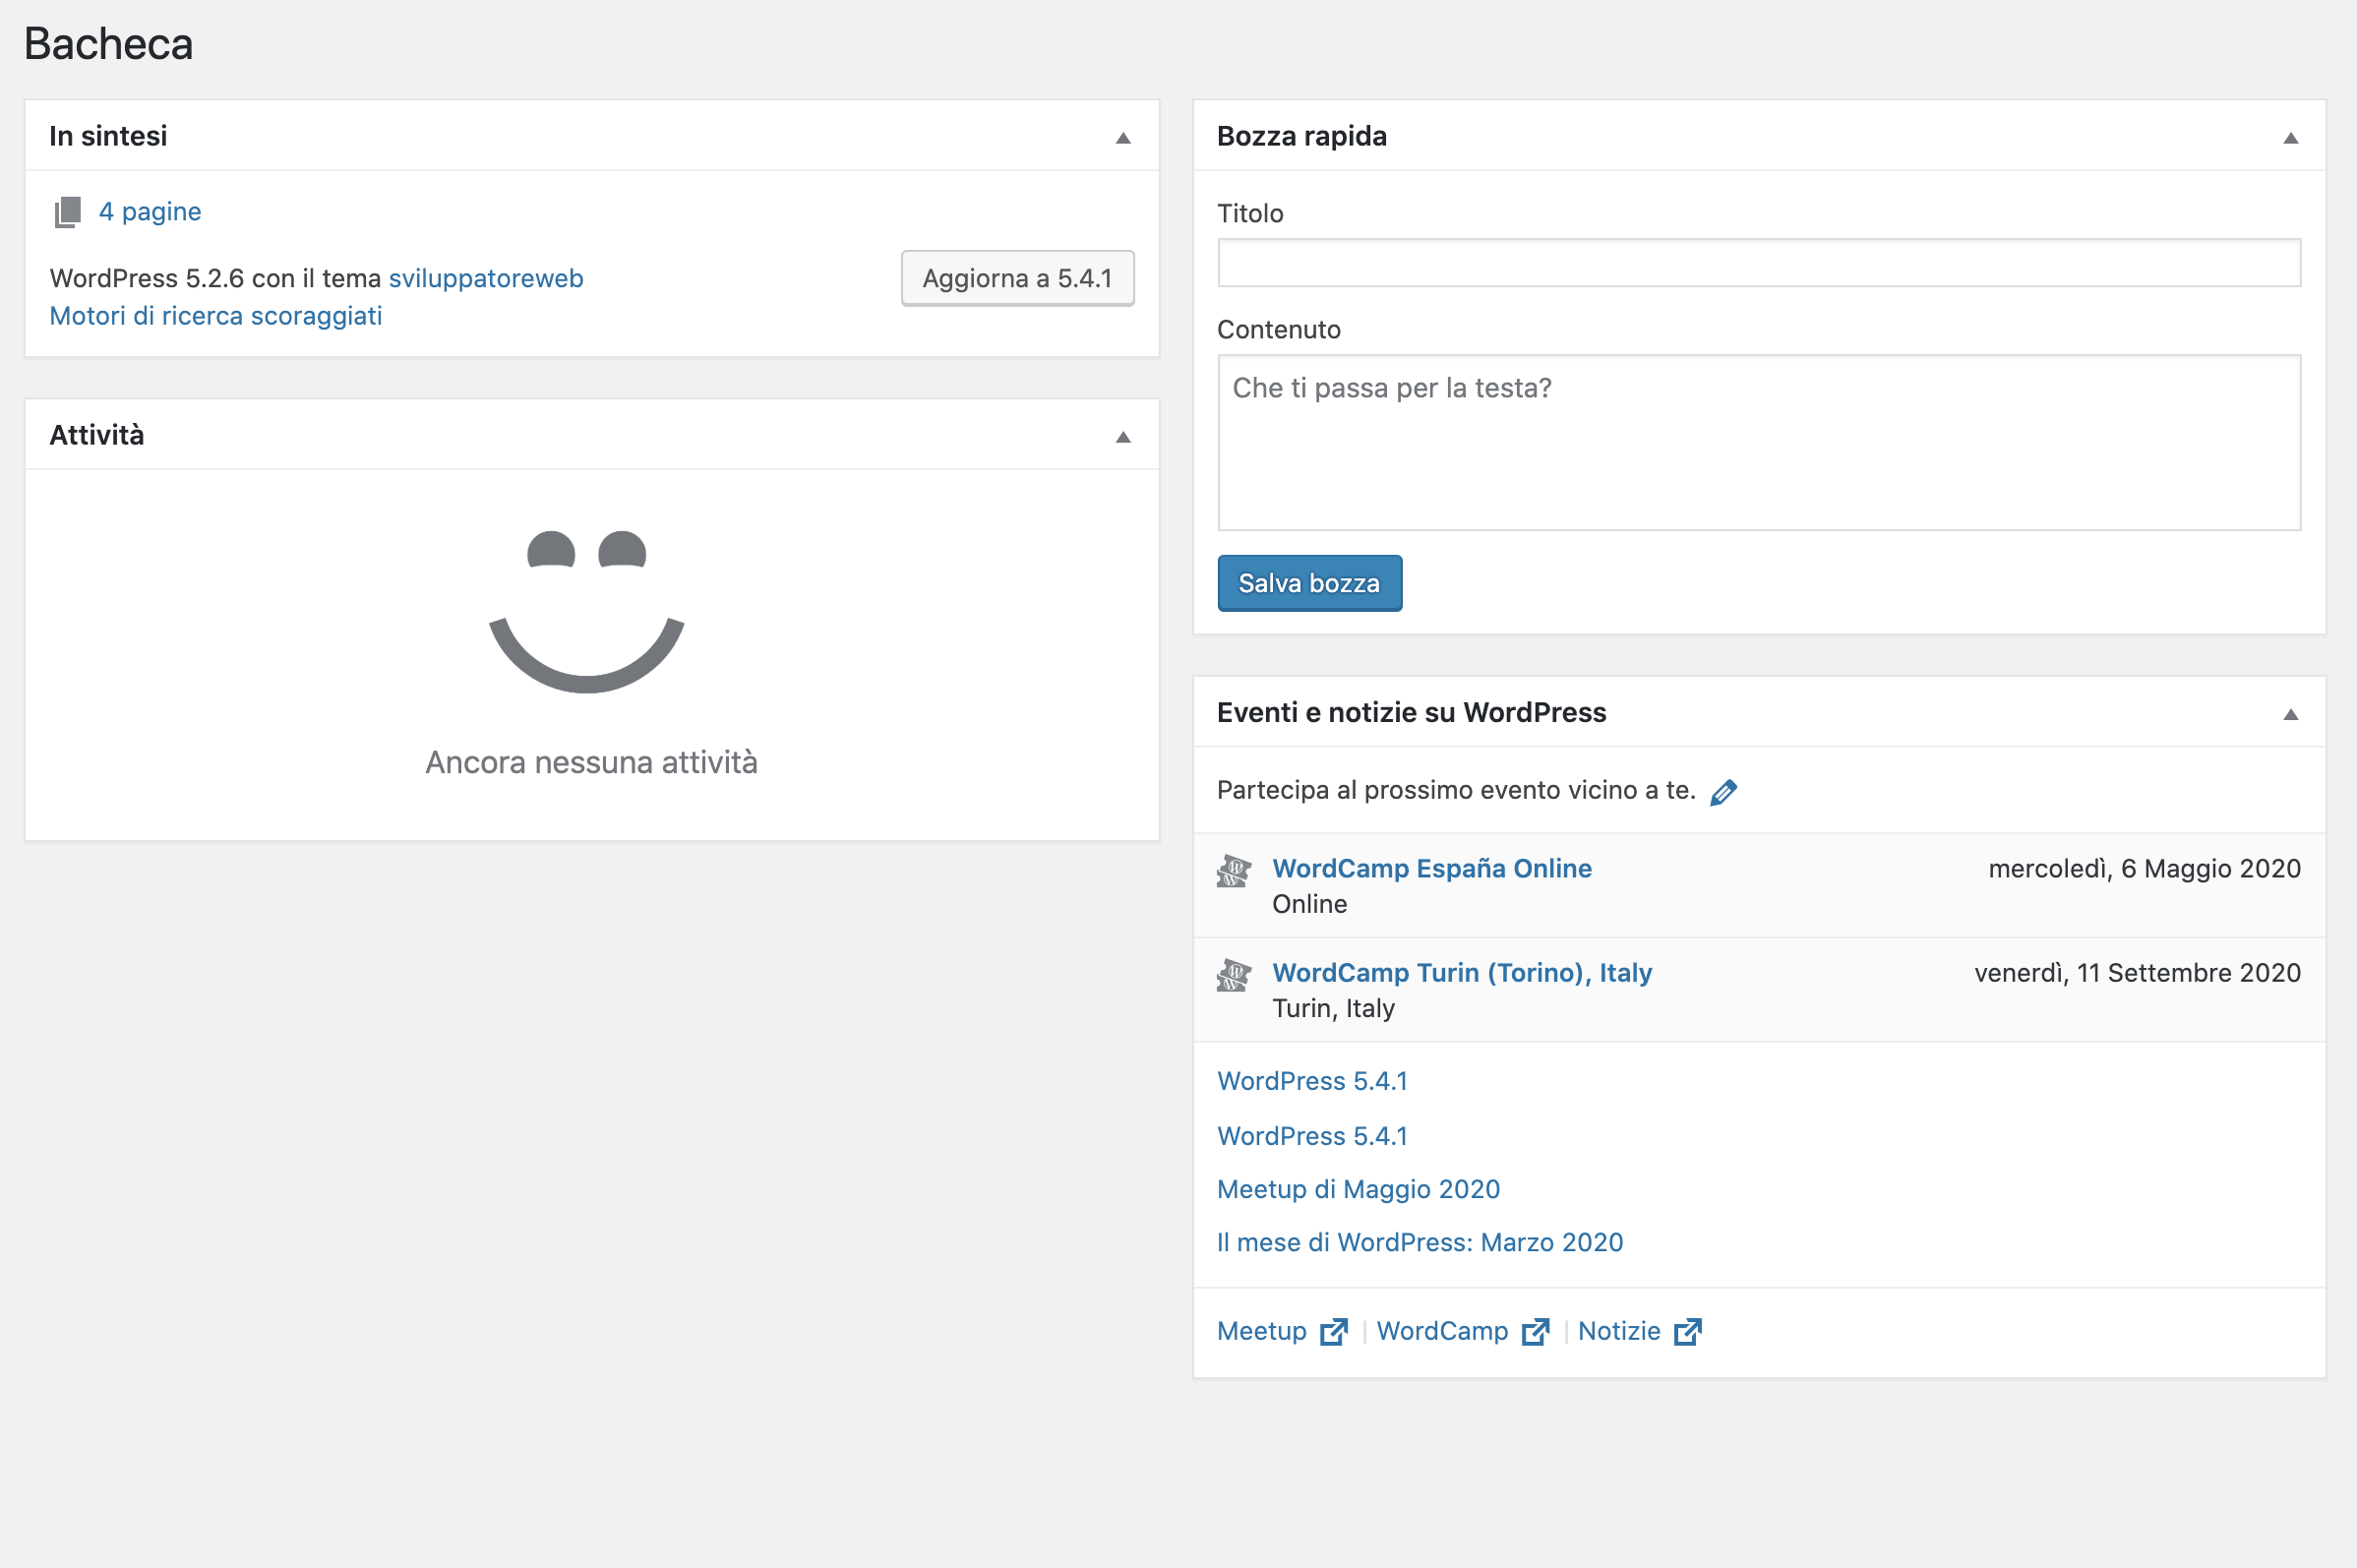
The WordPress backend is made up of several areas, each with specific functions. The left column is the administration menu . This is a two-level menu, with the top-level item often grouping together similar administration pages. The central area of ​​the main page is called the Dashboard ( Bacheca in the Italian version) and contains a series of widgets, which are areas that offer quick access to the most commonly used functions.

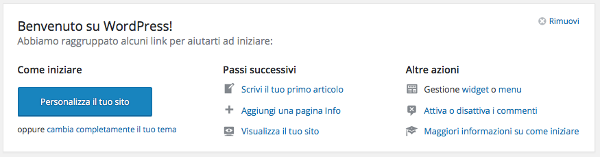
Figure 2. Welcome widget.
WordPress Dashboard

Below the Welcome widget, the default version of the WordPress Dashboard displays four widgets:

WidgetDescription
At a glanceIt provides a summary of the site’s content, divided into posts, pages, and comments. The current WordPress version and the name of the active theme are provided at the bottom of the widget.
Attività. ( Activity )It provides a summary of the most recent activity, scheduled and recently published posts, as well as a list of the latest comments.
Quick draftAllows you to quickly create a post draft.
Novit&agrave. di WordPress (WordPress News)Displays the latest news from the WordPress.org blog in your local language.

Figure 3. Dashboard widget.


At the top of the administration pages is the toolbar , which provides access to various administrative functions. By default, the toolbar remains visible to all authenticated users, even on the site’s front end.

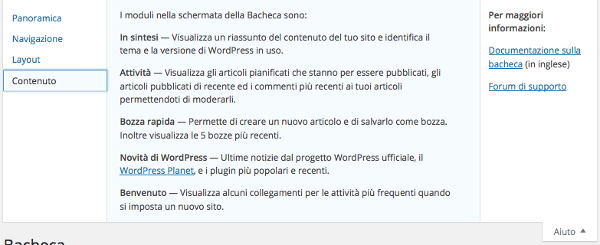
Directly below this is the “Screen Settings” tab. This displays a list of widgets available for each admin page and allows you to show or hide panels, customizing the page’s appearance.

Figure 4. Dashboard widget: screen settings.
Dashboard widget

The “Help” tab finally provides support information on the administration pages.

Figure 5. Dashboard widget: Help screen.
Dashboard widget

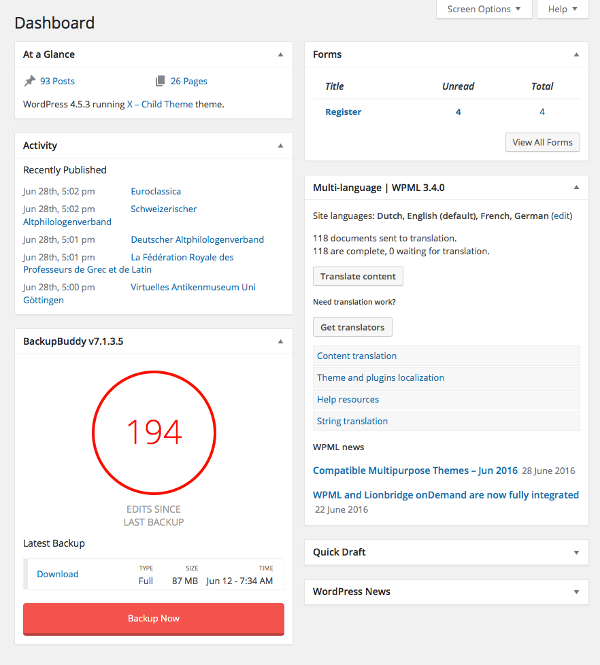
Many plugins add new panels to the default ones, enriching the home page with features and shortcuts. In addition to third-party plugins, developers can create their own widgets using the WordPress Dashboard Widgets API .

Figure 6. Boxes added by the Backup Buddy and WPML plugins.
WordPress Dashboard

The following are the main elements of the administration panel described in detail.

The WordPress Toolbar

The WordPress Toolbar is the ribbon located at the top of the admin panel. For authenticated users, the toolbar is also visible on the site’s front end. It primarily contains quick access menus, although its functions can be extended using the WordPress API. By default, the toolbar contains the following menus:

MenuDescription
WordPress LogoList of institutional links (e.g., online documentation).
Site NameBack-end: Links to the site’s home page. Front-end: Displays a submenu with links to various pages in the admin panel.
UpdatesGo to the updates page.
CommentsShows the number of recent comments and links to the corresponding administration page.
NewDisplays a submenu whose items point to the new content creation pages.
My AccountDisplays information about the current user and links to the profile and logout page.

Figura 7. WordPress Toolbar.
WordPress Toolbar

Plugins and themes can add elements to the Toolbar to make it easier to manage users with the right level of privileges.

The administration menu

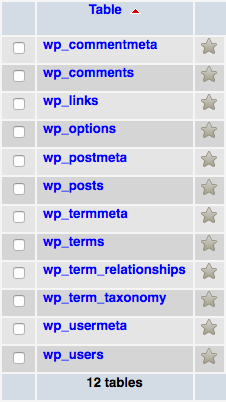
The first group of items in the administration menu contains the items “Wallboard”, “Posts”, “Media”, “Pages” and “Comments”.

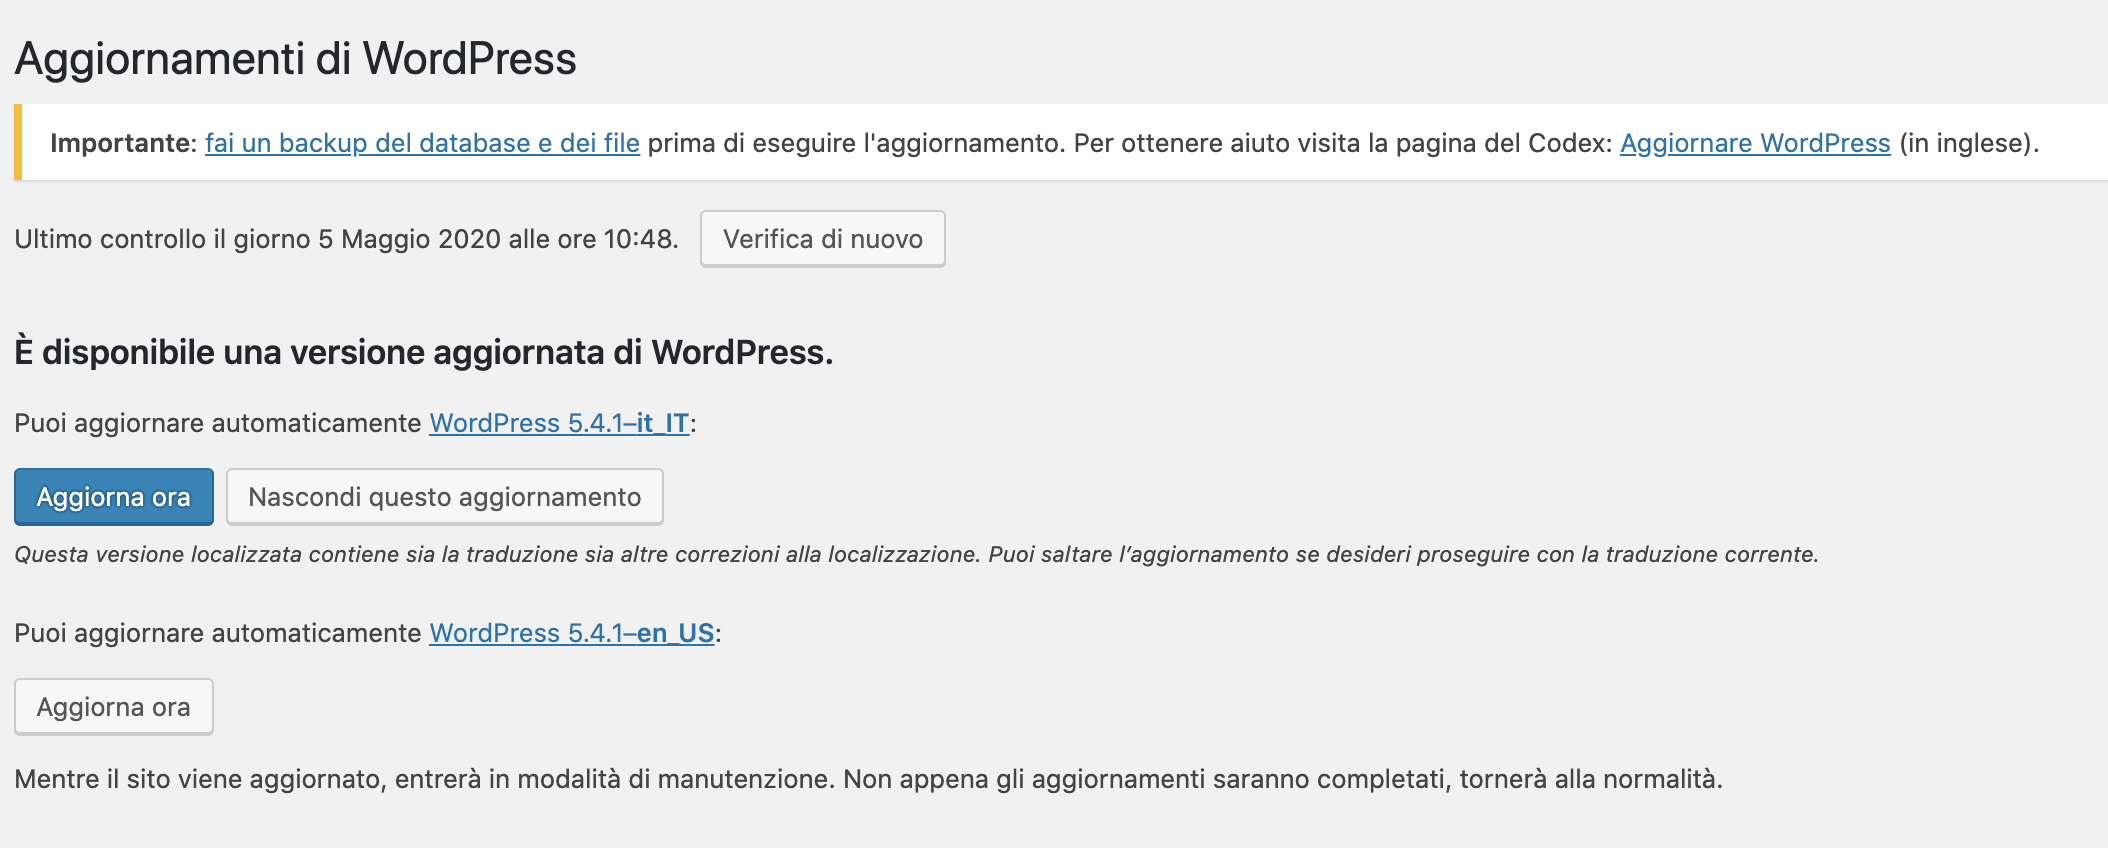
From “Dashboard” you can access “Updates.” From here you can manage all updates to your installation, from the CMS version to the plugins and themes already installed. Extensions can be updated one at a time, or selected cumulatively. Prudence recommends avoiding updates, backing up before any updates, deactivating plugins before updating them, and reactivating them one at a time after the update to check for incompatibilities and conflicts.

Figure 8. “Updates” menu.

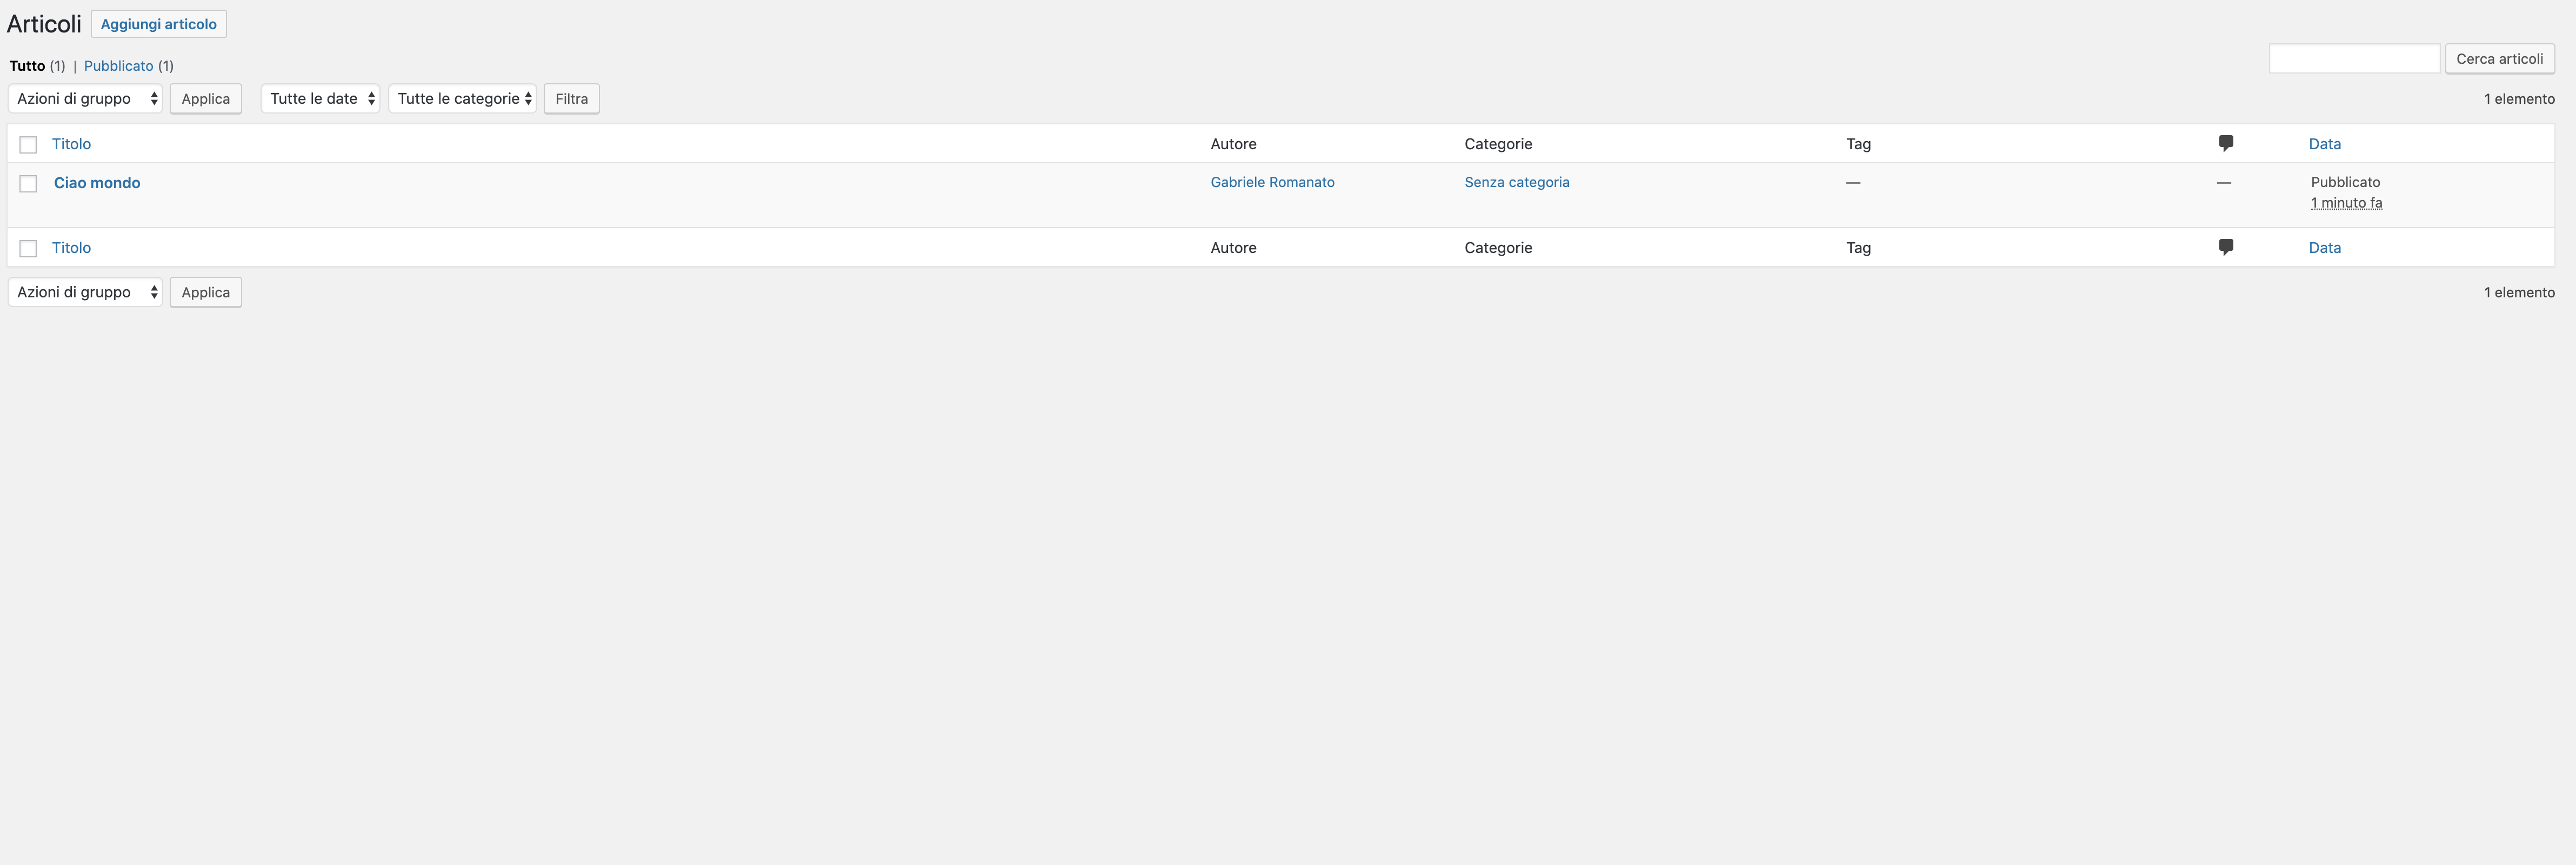
“Posts” provides access to the menu items for creating and managing posts. From here, you can access the post list, access the creation and editing page, and manage content categories and tags .

Figure 9. “Article Actions” menu.
 

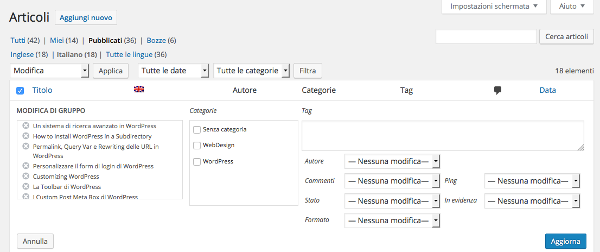
A cool feature is “Batch Actions,” which allows for cumulative changes to certain article data, such as categories, tags, author, status, format, and more.

Figure 10. “Group Actions” menu.
Group Actions Menu

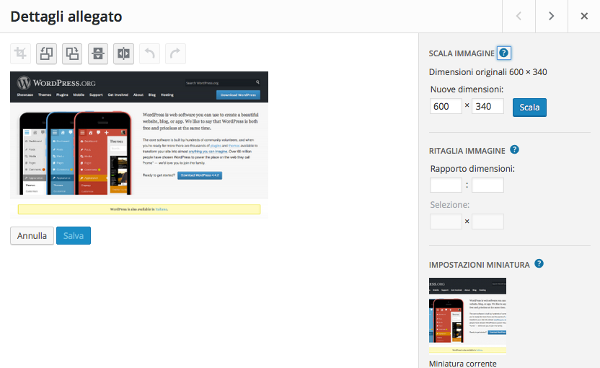
The “Media” tab provides access to media management. From here, you can select files from your desktop with a simple drag-and-drop. You can then assign data to the files, such as title, caption, alt text, and description. For images, WordPress also allows you to perform some basic editing, such as rotating, cropping, and resizing.

Figure 11. Edit Image.
Edit Image

“Pages” and “Comments” complete the first group of items in the administration menu. Managing these two types of content is similar to managing posts.

How to setup wp-config.php file.

This file wp-config.phpis the main file for the WordPress installation . It’s located in the root directory and stores all the main configuration parameters. It’s used to configure the database connection, improving site performance and security. It also allows you to enable WordPress debug mode , providing useful information during development. The file isn’t immediately available but is created when WordPress is started for the first time.

Figure 1. Parameters of the wp-config.php file
Connection details

If WordPress doesn’t have the necessary write privileges to create the file, the site administrator will need to rename it wp-config-sample.phpto wp-config.php, manually setting the values ​​of the constants declared in the file. These constants are defined in a specific order that shouldn’t be altered to avoid runtime errors. Let’s see which parameters are stored in the configuration file.


MySQL Settings

wp-config.phpstores MySQL settings, these are stored in the following constants:


/** Il nome del database di WordPress */
define('DB_NAME', 'wordpress');
/** Nome utente del database MySQL */
define('DB_USER', 'root');
/** Password del database MySQL */
define('DB_PASSWORD', 'root');
/** Hostname MySQL */
define('DB_HOST', 'localhost');
/** Charset del Database da utilizzare nella creazione delle tabelle. */
define('DB_CHARSET', 'utf8mb4');
/** Il tipo di Collazione del Database. Da non modificare se non si ha idea di cosa sia. */
define('DB_COLLATE', '');


The values ​​set in the example code refer to a local installation ; when you’re not working locally, the host will provide the necessary data. Obviously, to enter the database name, you’ll need to make sure you’ve created one, as WordPress won’t create it for you.

The hostname can also be detected automatically by defining the constant DB_HOSTas follows:


define('DB_HOST', $_ENV{DATABASE_SERVER});


In this case, of course, the file will have to be edited manually.

This constant DB_CHARSETsets the character set to use when defining database tables. Starting with WordPress version 4.2, the default character set is no longer UTF-8 but utf8mb4, a set with identical characteristics to UTF-8 but with one additional byte per character. Support for utf8mb4improves WordPress usability in languages ​​that use the Han character set (Chinese, Japanese, Korean). In general, changing the default value is neither necessary nor recommended.

The constant DB_COLLATEsets the value of the collation, that is, the order of letters, numbers, and symbols in the character set. If left blank, the collation will be assigned based on the value of DB_CHARSET. The charset utf8mb4will correspond to the collation utf8mb4_unicode_ci. Again, it is best to leave the value of the constant unchanged.

Security keys

To ensure better encryption of information stored in cookies, wp-config.phpit uses 8 authentication keys that can be freely set by the site administrator. To generate more secure keys, you can use the WordPress secret key service . The following is an example set of keys:

Figure 2. The 8 authentication keys in wp-config.php.

Authentication keys are required for the security system. Salt keys are recommended, but not required.


The table prefix

During installation, WordPress generates tables in which data is stored as the site is developed and updated. Each table is assigned a name with a prefix whose default value is wp_.

Figure 3. WordPress database tables with “wp_” prefix.
WordPress database tables with prefix

To avoid SQL injections, it’s best to keep the database table names unknown. Therefore, it’s always advisable to set a prefix other than the default during installation. The set value is stored in the file wp-config.phpin the variable $table_prefix:

$table_prefix = 'wp_';
 

You can also manage multiple installations with a single database by setting a different value for the variable $table_prefixin each installation. Only numbers, letters, and the underscore are allowed.

If the site is already active, you can still change the value of $table_prefix. Once the new value has been set, you will need to update the table names and some field values: in the table, wp_optionsthe value of the field option_namecorresponding to wp_user_roles(if present) will need to be updated, while in the table, wp_usermetathe values ​​of the fields meta_keycontaining the string will need to be reset wp_.

Figure 4. wp_usermeta table.
wp_usermeta table

Before modifying a working site, it is a good idea to perform a preventive backup.

In the next post, we’ll go beyond the basic settings and see how to use the configuration file to get the most out of WordPress in terms of speed and security.


AI-Assisted Coding in 2025: Challenges, Opportunities, and Best Practices

In 2025, artificial intelligence is becoming an increasingly essential resource for programmers. It’s no longer just a futuristic technology, but a concrete tool that revolutionizes the coding process. Tools like GitHub Copilot , Tabnine , and Amazon CodeWhisperer aren’t just assistants, but true coding partners, capable of suggesting, optimizing, and even generating code segments in real time.

But all that glitters is not gold. The adoption of these tools also raises critical questions: how much are we really evolving as developers? And how much are we at risk of losing our critical thinking and skills?

What Is AI-Assisted Coding?

AI-assisted coding uses artificial intelligence tools: such as code completion models, natural-language-to-code generators, and debugging assistants, to help developers write, optimize, and maintain software faster.
These tools analyze patterns in existing codebases, predict developer intent, and generate suggestions or full code blocks automatically.

The Best AI-Assisted Coding Tools

GitHub Copilot is probably the best-known name in this field. Created by GitHub and OpenAI, it can suggest entire functions and blocks of code based on simple comments or instructions. Its power lies in the fact that it learns from the billions of lines of open-source code published on GitHub, continuously adapting to the programmer’s needs. Its only limitation may be that, if left unmonitored, it can generate code that doesn’t always follow best practices or may contain hidden errors.

Tabnine , on the other hand, stands out for its ability to work with multiple languages ​​and its commitment to offering a privacy-friendly solution, a feature that makes it ideal for corporate teams or projects with sensitive code. Unlike Copilot, which relies on the open-source community, Tabnine can be customized to a team’s specific needs, allowing support to be tailored to their daily workflow.

Finally, Amazon CodeWhisperer is a tool that integrates seamlessly with the AWS ecosystem, offering specific recommendations for cloud application development. It focuses on developing code for modern infrastructure and microservices, and can recognize the cloud computing context to propose optimized solutions.

Opportunity: Why AI is a Boon for Developers

AI-assisted coding tools offer numerous advantages, especially in terms of speed and productivity. The ability to generate repetitive and boilerplate code in seconds reduces the time required to write basic functions, allowing developers to focus on the more complex aspects of the project.

Furthermore, AI assistants can act as digital tutors , offering suggestions and solutions that often don’t even occur to experienced programmers. AI can suggest techniques and solutions that meet industry best practices, helping to write cleaner, more efficient code.

Another crucial benefit is ongoing training . Learning new technologies or languages ​​becomes much easier thanks to AI’s ability to suggest alternatives and show you how to solve problems differently. If you’re unsure how to implement a particular function, an AI assistant will provide you with practical solutions and examples.

Risks and Limitations: The Dark Side of Automation

However, the use of artificial intelligence also raises some concerns. One of the main risks is cognitive dependence . Overreliance on these tools can lead to a reduction in autonomous problem-solving ability. In other words, if we become too accustomed to receiving ready-made suggestions, we risk losing our ability to tackle challenges independently.

Furthermore, the quality of AI-generated code isn’t always guaranteed. While AI assistants are excellent at generating boilerplate code, they may not be able to address complex scenarios or optimize solutions for specific cases. For example, AI may not understand the context of an architectural decision and generate code that works, but isn’t scalable or maintainable over the long term.

Another issue concerns intellectual property rights . Some AI-generated code snippets may be taken from repositories or projects that aren’t fully open source, leading to licensing or plagiarism issues if not properly monitored.

Best Practices for Healthy AI-Assisted Development

To prevent AI agents from becoming a “rubber band” that limits rather than empowers you, it’s important to follow some best practices. First, never blindly trust what AI suggests. Each suggestion must be carefully evaluated, tested, and optimized, especially with regard to security and performance.

Furthermore, developers should use AI as a learning tool , not as a substitute for their own creativity and problem-solving. Whenever AI suggests a solution, ask yourself if it’s truly the best option for your project, and try to learn from it.

Finally, integrating static analysis tools and linters remains essential. These tools, which analyze code without executing it, can act as a “second opinion” and help you detect errors or issues that AI might miss.

Conclusion: The Future is Hybrid, Not Substitute

Artificial intelligence in coding represents an extraordinary opportunity, but it must be used wisely. Developers who can leverage the strengths of AI tools without losing control, combining the efficiency of automation with human creativity and critical thinking, will undoubtedly dominate programming in the coming years. Ultimately, AI is not a threat to the profession, but an enhancement of human capabilities.

Frequently Asked Questions (FAQ)

Q1: Can AI replace human programmers in 2025?
No. AI speeds up development but still needs human oversight for logic, design, and context.

Q2: Is AI-generated code secure?
Not always. Developers must review and test AI output for security vulnerabilities.

Q3: Which industries benefit most from AI-assisted coding?
Finance, healthcare, cybersecurity, and SaaS sectors are leading adopters due to automation and compliance needs.

Mass Storage Analysis: The Key Role in Modern Cybersecurity

In the world of modern cybersecurity, mass storage analysis is a crucial skill. Hard drives, SSDs, USB drives, and mobile devices can contain vital evidence during a cyber investigation. Using digital forensics techniques , specialists can recover deleted data, identify hidden malware, and reconstruct attacker activity.

In this article, we’ll explore the most commonly used techniques, key tools, and best practices for effective analysis.

What is mass storage?

Mass storage devices are devices designed for long-term digital data storage. Among the most common are traditional hard disk drives (HDDs), solid-state drives (SSDs), USB flash drives, memory cards, and even mobile devices such as smartphones and tablets.

During a forensic investigation, it’s crucial to distinguish between live analysis and dead analysis . Live analysis involves working on a system that’s still running to capture volatile data, such as that stored in RAM; dead analysis involves working on an exact copy of the powered-off device, avoiding any alteration of the original data.

Why is mass storage analysis important in cybersecurity?

When a cyber incident occurs, the contents of mass storage devices can tell a detailed story: where the attacker entered, what they did, what data they touched or encrypted. Analysis therefore allows you to identify hidden malware, recover deleted data, reconstruct suspicious activity through logs and timestamps, and ultimately gather evidence that can be used in legal proceedings.

In an age where ransomware and data theft are rife, the ability to extract this information can mean the difference between a business recovering quickly and one suffering irreparable damage.

How Does Mass Storage Analysis Work?

The forensic analysis of a mass storage device follows a very precise methodical sequence.
It begins with the creation of a forensic image of the device, a bit-for-bit copy that guarantees data integrity using hashing algorithms such as MD5 or SHA-256. This copy is then verified to ensure it exactly reflects the original.

The analysis continues by studying the file system structure, specifically elements such as the Master File Table (MFT) in NTFS systems, the Windows registry, and event logs. Equally important is data carving, which allows for the recovery of deleted file fragments without relying on the file system structure.

Finally, the so-called forensic artifacts are analyzed: temporary files, shortcuts (.lnk), browsing histories, paging files and anything else that can provide clues about the activities carried out on the device.

The main tools for analysis

Numerous tools support forensic analysts in their work. Autopsy, for example, is a widely used open-source platform for analyzing disks and file systems. FTK Imager is an application specialized in creating forensic images, while EnCase Forensic proves essential for more complex investigations thanks to its wide range of features.

For mobile and cloud analytics, Magnet AXIOM is an excellent choice. Additionally, it’s not uncommon for more experienced professionals to develop custom scripts in Python or Bash to automate repetitive tasks or analyze large volumes of data.

Practical cases of forensic analysis

The concrete application of these techniques can vary greatly.
In a ransomware attack, for example, mass storage analysis allows for the identification of the malware’s initial entry point, understanding how it propagated, identifying encrypted files, and gathering evidence of the attacker’s activities.

In insider threat scenarios, however, analysis can lead to the recovery of files copied to USB devices, the reconstruction of manipulated system histories, or the discovery of previously hidden suspicious activity.

Best practices for correct analysis

To ensure the legal and technical validity of the evidence collected, it is essential to adhere to certain best practices.
These include preserving the chain of custody by recording every stage of the analysis, working exclusively with forensic copies of the original device, meticulously documenting all operations performed, and adopting recognized international standards, such as those defined by the ISO/IEC 27037 standard.

Conclusions

Mass storage analysis is a complex discipline that requires rigor, technical expertise, and attention to detail. But it is also one of the most powerful tools available to cybersecurity professionals, enabling them to effectively respond to incidents, prevent future threats, and obtain legal redress.

Investing in forensic expertise and the right tools is no longer optional: it is a strategic necessity for any organization that wants to defend itself in today’s digital world.

Data Carving: What It Is and How It Works

Data carving , also known as file carving , is an advanced data recovery technique used primarily in digital forensics. Unlike traditional methods, data carving allows information to be extracted from damaged, formatted, or partially overwritten media, even when the file system is missing or compromised.

In this article, we’ll explore in detail what data carving is, how it works, its main applications, and the most widely used tools in cybersecurity and forensics.


How Does Data Carving Work?

The data carving process generally occurs in three phases:

1. Disk Scan

The software analyzes the binary content byte by byte, looking for known signatures ( magic numbers ) that identify the beginning and end of a file. For example:

  • JPEG: FFD8at the beginning, FFD9at the end

  • PDF: %PDFand%%EOF

  • ZIP:504B0304

2. File Extraction

Once the signatures are found, the system extracts the sequence of bytes between the header and footer, copying it into a new file.

3. Validation and Reconstruction

Some advanced tools attempt to reconstruct corrupted or partial files by checking the consistency of their contents (checksum, internal structure, etc.).


Applications of Data Carving in Cyber ​​Security

1. Forensic Analysis

In the context of digital investigations, data carving is essential to recover evidence even from damaged, formatted, or intentionally tampered with devices.

2. Data Recovery

Many consumer data recovery software uses file carving techniques to restore deleted documents, photos, and archives.

3. Incident Response

During incident response, data carving can help recover files exfiltrated, modified, or hidden by malware.


Limitations and Challenges of Data Carving

  • Lack of Metadata : Recovered files often do not include original names, timestamps, or directories.

  • Fragmentation : If blocks in a file are scattered and non-contiguous, carving may fail.

  • False Positives : The presence of random patterns can generate corrupt or fake files.


Tools Used for Data Carving

Here are some of the most popular and reliable open source tools:

  • Scalpel – Lightweight, fast and configurable.

  • PhotoRec – Extremely powerful and compatible with multiple formats.

  • Foremost – Developed by the US Air Force, ideal for forensic contexts.

  • bulk_extractor – For advanced analysis on large volumes of data.


Best Practices and Advice for Those Working in the Sector

If you’re a cybersecurity professional or developer interested in building data carving tools, here are some recommendations:

  • Automate signature scanning in Linux environments with Python scripts.

  • Combine carving with hash analysis to verify file integrity.

  • Experiment with virtual file systems (e.g., EWF, AFF) for forensic image testing.

  • Keep your signature databases up to date , especially if you develop custom carving software.


Conclusion

Data carving is one of the most powerful tools in the digital forensics toolkit. Despite its limitations, it remains essential when access to metadata is impossible. Whether you’re a forensic analyst, a cybersecurity expert, or a curious programmer, understanding how these techniques work can make the difference between an incomplete analysis and a decisive discovery.


The Cyber ​​Kill Chain: The Phases of a Cyber ​​Intrusion

What is the Cyber ​​Kill Chain?

The Cyber ​​Kill Chain is a model developed by Lockheed Martin to describe the main phases of a cyber attack. This framework is widely used in cybersecurity to analyze, detect, and disrupt intrusions at each stage.

Why is it important to know it?

Understanding the Cyber ​​Kill Chain allows cybersecurity professionals to take targeted countermeasures, identifying defense vulnerabilities and blocking attacks before they reach critical targets.


The 7 Phases of the Cyber ​​Kill Chain

1. Reconnaissance

Objective : Gather information about the victim.
Attackers collect public data such as email addresses, employee names, network configurations, and technical details. Common techniques: OSINT, social engineering, port scanning.

Countermeasures : Minimize publicly exposed information, use honeypots and behavioral detection systems.

2. Armament (Weaponization)

Objective : Payload creation.
The attacker prepares malware, exploits, or malicious documents to send to the victim, often combining exploits and backdoors.

Countermeasures : Use sandboxing, behavioral analysis, and threat intelligence to identify new weapons.

3. Distribution (Delivery)

Objective : Malware delivery to the target.
Common means: phishing emails, drive-by downloads, watering hole attacks, or compromised USB devices.

Countermeasures : Staff training, anti-phishing filters, email security.

4. Exploitation

Objective : Payload activation.
The malicious code exploits a vulnerability to execute code on the victim’s machine.

Countermeasures : Regular updates, patch management, mitigations such as ASLR and DEP.

5. Installation

Objective : Establish a persistent presence.
Malware or a backdoor is installed that allows continuous control of the system.

Countermeasures : System file monitoring, EDR (Endpoint Detection and Response), application whitelisting.

6. Command and Control (C2)

Objective : Communication with the attacker’s infrastructure.
The malware contacts a remote server to receive commands.

Countermeasures : Network traffic analysis, blocking known IPs/domains, DNS sinkhole.

7. Actions on Objectives

Objective : Achieve the final goal (data theft, sabotage, espionage).
In this phase, the attacker acts according to their intentions, such as exfiltrating data or encrypting files (ransomware).

Countermeasures : Data Loss Prevention (DLP), network segmentation, continuous monitoring.


Cyber ​​Kill Chain and Mitre ATT&CK: Complementarity

While the Cyber ​​Kill Chain provides a linear view of the attack, the MITRE ATT&CK framework enriches it by detailing the techniques used at each stage. Using both allows for a more comprehensive and thorough defense.


Conclusion

Incorporating the Cyber ​​Kill Chain into your cybersecurity strategy is essential to anticipate and disrupt cyber attacks . Understanding the stages of an intrusion allows you to respond proactively, protecting systems and data.


MITRE ATTACK: What It Is and Why It’s Critical to Cybersecurity

In the increasingly complex cybersecurity landscape , understanding attacker behavior is essential. One of the most effective tools for this purpose is the MITRE ATT&CK Framework . In this article, we’ll explore what MITRE ATT&CK is, how it works, and why every developer and cybersecurity professional should know it.

What is MITRE ATT&CK?

MITRE ATT&CK (Adversarial Tactics, Techniques & Common Knowledge) is an open-source framework developed by MITRE Corporation. It collects and classifies the tactics and techniques used by cybercriminals during real-world cyberattacks, providing a concrete basis for proactive defense and forensic analysis .

It is structured as a matrix that maps the phases of an attack (tactics) with the specific methods used (techniques). It is widely used in red teams , blue teams , threat intelligence, and SIEM/SOAR solution development .


Why is it Important for Cyber ​​Security?

1. Knowledge of real attacks

ATT&CK is based on empirical data from real incidents. These are not theoretical simulations, but tactics actually used by APT (Advanced Persistent Threat) groups.

2. Improve detection

By integrating ATT&CK with monitoring tools like SIEM , you can significantly improve your ability to detect suspicious behavior through logs, events, and attack patterns.

3. Standardization of analyses

It provides a common language for describing attacks, useful for sharing intelligence across teams, companies, or research communities.

4. Support for secure programming

Programmers can use the framework to identify the most exposed attack surfaces and implement targeted countermeasures during development.


Structure of the ATT&CK Matrix

The matrix is ​​divided into:

  • Tactics : The attacker’s strategic goals (e.g., Initial Access, Execution, Persistence, etc.).

  • Techniques : The specific methods used (e.g., Spear Phishing, PowerShell Execution, DLL Injection).

  • Sub-techniques : More detailed variations of techniques.

There are different versions of the framework for specific environments:

  • Enterprise ATT&CK (Windows, Linux, macOS, Cloud)

  • Mobile ATT&CK

  • ICS ATT&CK (Industrial Control Systems)


How to Use ATT&CK in Your Work

 Blue Team

  • Map the techniques detectable with your current tools.

  • Identify gaps in defensive coverage.

  • Build SIEM use cases and SOAR playbooks.

 Red Team

  • Simulate realistic attacks using ATT&CK techniques.

  • Plan MITRE ATT&CK-based adversary emulation exercises .

  Developers and DevSecOps

  • Identify techniques relevant to your applications.

  • Automate security testing based on common tactics.

  • Build smarter logging and auditing tools.


Useful tools based on ATT&CK

  • MITRE ATT&CK Navigator : View and customize the matrix.

  • Caldera : Automated ATT&CK attack simulation.

  • Atomic Red Team : Collection of security tests mapped to ATT&CK.


Conclusion

The MITRE ATT&CK Framework has become a de facto standard in modern cybersecurity. Whether you’re a SOC analyst , a developer , or part of a red team , understanding and integrating ATT&CK into your daily work is an investment in resilience and awareness .


What is a CI/CD pipeline?

CI/CD pipeline is a series of orchestrated steps designed to bring source code to production. These steps include building, packaging, testing, validation, infrastructure verification, and deployment to all necessary environments. Depending on organizational structures and the team, multiple pipelines may be needed to achieve this goal. A CI/CD pipeline can be triggered by some sort of event, such as a pull request from a source code repository (e.g., a code change), the presence of a new artifact in an artifact repository, or some sort of regular schedule to match a release cadence.

Benefits of the CI/CD pipeline

Unlike software languages, where you can adopt approaches and design patterns from one company to the next, deployments are almost always unique. Very rarely are two applications (and their supporting infrastructure) the same. Software development and delivery are iterative exercises, and pipelines should be run multiple times a day, including for bug fixes. By adopting a systematic approach with a CI/CD pipeline, teams can gain a clearer understanding of what’s needed to bring their ideas to production. Because pipelines are systemic, bottlenecks can be easily identified and resolved compared to a disjointed, human-driven process with multiple deployment steps.

Stages of a CI/CD pipeline

The steps that make up a  CI/CD pipeline  are distinct subsets of activities grouped together into what’s known as a pipeline stage. Typical pipeline stages include:

1) Build – The phase in which the application is compiled.
2) Test – The phase in which the code is tested.
3) Release – The phase in which the application is delivered to the repository.
4) Deployment – In this phase, the code is deployed to production.
5) Validation – In this phase, the software is validated for the presence of known vulnerabilities (CVEs).

How Automated CI/CD Pipelines Help Developer Teams

In modern organizations, the CI/CD pipeline is the channel for bringing developer code into production. Software engineering is an iterative exercise, and with  automated CI/CD pipelines  , engineers can execute pipelines without human intervention. Imagine if every time you needed to run a test suite or prepare the infrastructure for the next environment, you had to coordinate with an external team. This would reduce iterations and extend the steps, increasing confidence and preventing you from looking foolish in front of your peers.

By enabling self-service, developers can learn the rigor their changes require and make adjustments more quickly. One of the primary goals of DevOps teams is to enable greater pipeline learnability and usability. Some environment-driven pipelines could allow developers to execute up to the pre-production stage, then require another pipeline to reach production environments. This would allow for many iterations until the development team becomes comfortable with the pipeline. Fully automated CI/CD pipelines would go a step further and fully automate production.


API Key Leaks in CI/CD Pipelines: How to Protect Your Secrets

In the modern software development environment, automation via CI/CD pipelines has become standard. But with increasing speed comes increased risk, especially regarding the security of API keys and other sensitive secrets .

In this article, we’ll look at how credential leaks occur in DevOps pipelines and best practices for protecting against them , with real-world examples and practical advice.

What is an API Key Leak in CI/CD?

An API key leak occurs when a sensitive credential is accidentally exposed in an insecure context: logs, configuration files, commits, or build artifacts.

In the context of CI/CD (Continuous Integration / Continuous Deployment), these leaks are often the result of misconfigured pipelines , where environment variables or files containing secrets are not handled correctly.

Common Causes of API Key Leaks

1. Environment Variables Printed in Logs

A common mistake is to directly print variables to pipeline logs:

- name: Stampare variabile (NON SICURO)
  run: echo "API_KEY=${{ secrets.API_KEY }}"

These logs may be publicly accessible or retained for too long, becoming a risk.

2. Accidental Commits of Sensitive Files

Many leaks occur because of commits containing:

  • .env

  • config.js

  • secrets.yaml

Even with .gitignore, human errors or git add -fcan force the addition of dangerous files.

3. Contaminated Artifacts and Builds

Generated files (e.g. .zip.tar.gz, Docker containers) may contain:

  • Embedded token

  • Incorrect configurations

  • Logs with exposed secrets

An attacker who downloads these files can easily extract the keys.

4. Access Tokens with Excessive Permissions

It’s common to generate tokens with administrative permissions used in pipelines for convenience. But if that token is compromised, an attacker can:

  • Edit the code

  • Access cloud systems

  • Create additional backdoors


How to Protect Secrets in CI/CD

1. Masking Variables in Logs

Systems like GitHub Actions or GitLab CI allow you to mark secrets as “masked” to prevent them from being printed in logs.

2. Using External Secret Managers

Examples:

  • GitHub Actions Secrets

  • AWS Secrets Manager

  • Doppler

  • Azure Key Vault

  • HashiCorp Vault

Avoid saving secrets directly in the repository or in clear text in .yaml.

3. Automatically Scan for Secrets in the Code

Recommended tools:

Integrate these tools directly into your CI flow to scan every push.

4. Regular Rotation of Secrets

Establish policies to rotate keys periodically , as part of the security cycle.

5. Set Permissions

Apply the principle of least privilege :

  • A secret for every purpose

  • Limited scopes

  • No unnecessary permissions


Real-World Case Study: Cryptocurrency Mining on the AWS Cloud

In 2024, an AWS key was exposed in a GitHub Actions log. In less than 12 hours, an automated bot used the key to launch EC2 instances and mine cryptocurrency, generating over €300 in cloud spending .

These attacks are often automated: bots monitor public platforms like GitHub in real time for exposed secrets.


Final Checklist: CI/CD Security

  • Never print secrets in logs

  • Use secret management tools

  • Scan every commit for exposed secrets

  • Restrict token permissions

  • Rotate secrets periodically

  • Clean up artifacts and public builds


Conclusion

Secret leaks through CI/CD are among the most insidious vulnerabilities because they don’t stem from a bug in the code , but from poor operational practices. Investing in pipeline security is essential to protecting modern applications.


Crafting an Sophisticated Voice AI Pipeline: Leveraging WhisperX for Transcription, Alignment, Analysis, and Export

In this comprehensive guide, we delve into an in-depth implementation of WhisperX, exploring transcription, alignment, and word-level timestamps. We’ll set up the environment, load and preprocess audio, and then execute the full pipeline, from transcription to alignment and analysis, ensuring memory efficiency and supporting batch processing. Along the way, we’ll visualize results, export them in multiple formats, and even extract keywords to gain deeper insights from the audio content.

Setup and Configuration

We commence by installing WhisperX along with essential libraries, such as pandas, matplotlib, and seaborn. We then configure our setup, detecting whether CUDA is available, selecting the compute type, and setting parameters like batch size, model size, and language to prepare for transcription.

“`python
!pip install -q git+https://github.com/m-bain/whisperX.git
!pip install -q pandas matplotlib seaborn

import whisperx
import torch
import gc
import os
import json
import pandas as pd
from pathlib import Path
from IPython.display import Audio, display, HTML
import warnings
warnings.filterwarnings(‘ignore’)

CONFIG = {
“device”: “cuda” if torch.cuda.is_available() else “cpu”,
“compute_type”: “float16” if torch.cuda.is_available() else “int8”,
“batch_size”: 16,
“model_size”: “base”,
“language”: None,
}
“`

Audio Processing and Transcription

We begin by downloading a sample audio file for testing and loading it for analysis. We then transcribe the audio using WhisperX, setting up batched inference with our chosen model size and configuration. We output key details such as language, number of segments, and total text length.

“`python
def download_sample_audio():
“””Download a sample audio file for testing”””
!wget -q -O sample.mp3 https://github.com/mozilla-extensions/speaktome/raw/master/content/cv-valid-dev/sample-000000.mp3
print(” Sample audio downloaded”)
return “sample.mp3”

def load_and_analyze_audio(audio_path):
“””Load audio and display basic info”””
audio = whisperx.load_audio(audio_path)
duration = len(audio) / 16000
print(f” Audio: {Path(audio_path).name}”)
print(f” Duration: {duration:.2f} seconds”)
print(f” Sample rate: 16000 Hz”)
display(Audio(audio_path))
return audio, duration

def transcribe_audio(audio, model_size=CONFIG[“model_size”], language=None):
“””Transcribe audio using WhisperX (batched inference)”””
print(“\n STEP 1: Transcribing audio…”)
# … (rest of the function)
“`

Alignment and Word-Level Timestamps

Next, we align the transcription to generate precise word-level timestamps. By loading the alignment model and applying it to the audio, we refine timing accuracy and report the total aligned words while ensuring memory is cleared for efficient processing.

“`python
def align_transcription(segments, audio, language_code):
“””Align transcription for accurate word-level timestamps”””
print(“\n STEP 2: Aligning for word-level timestamps…”)
# … (rest of the function)
“`

Transcription Analysis

We analyze the transcription by generating detailed statistics such as total duration, segment count, word count, and character count. We also calculate words per minute, pauses between segments, and average word duration to better understand the pacing and flow of the audio.

“`python
def analyze_transcription(result):
“””Generate statistics about the transcription”””
print(“\n TRANSCRIPTION STATISTICS”)
print(“=”*70)
# … (rest of the function)
“`

**Results Visualization and Export**

We format results into clean tables, export transcripts to JSON/SRT/VTT/TXT/CSV formats, and maintain precise timestamps with helper formatters. We also batch-process multiple audio files end-to-end and extract top keywords, enabling us to quickly turn raw transcriptions into analysis-ready artifacts.

“`python
def display_results(result, show_words=False, max_rows=50):
“””Display transcription results in formatted table”””
# … (rest of the function)

def export_results(result, output_dir=”output”, filename=”transcript”):
“””Export results in multiple formats”””
# … (rest of the function)

def batch_process_files(audio_files, output_dir=”batch_output”):
“””Process multiple audio files in batch”””
# … (rest of the function)

def extract_keywords(result, top_n=10):
“””Extract most common words from transcription”””
# … (rest of the function)
“`

**Full Pipeline Execution**

Finally, we run the full WhisperX pipeline end-to-end, loading the audio, transcribing it, and aligning it for word-level timestamps. When enabled, we analyze stats, extract keywords, render a clean results table, and export everything to multiple formats, ready for real use.

“`python
def process_audio_file(audio_path, show_output=True, analyze=True):
“””Complete WhisperX pipeline”””
# … (rest of the function)

print(“\n Setup complete! Uncomment examples above to run.”)
“`

In conclusion, we’ve built a complete WhisperX pipeline that not only transcribes audio but also aligns it with precise word-level timestamps. We export the results in multiple formats, process files in batches, and analyze patterns to make the output more meaningful. With this, we now have a flexible, ready-to-use workflow for transcription and audio analysis, and we’re ready to extend it further into real-world projects.

Follow by Email
YouTube
WhatsApp