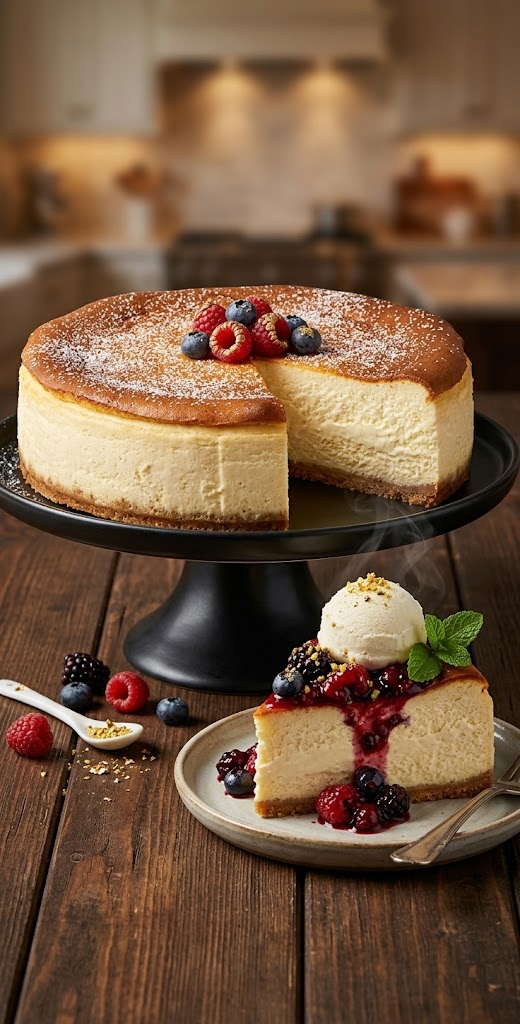

This Classic Creamy Cheesecake features a buttery graham cracker crust topped with a rich, smooth, and velvety cream cheese filling. The gentle tang of cream cheese and lemon balances the sweetness, while slow baking helps create that signature dense-yet-creamy texture.
It’s an elegant dessert that feels special without requiring complicated ingredients. Enjoy it plain, with fresh berries, or finished with your favorite fruit, chocolate, or caramel topping.
Can This Classic Creamy Cheesecake Support Weight Loss Goals?
Traditional cheesecake is an indulgent dessert because it contains full-fat cream cheese, sugar, eggs, and a buttery crust. It can still be enjoyed occasionally as part of a balanced eating pattern when portions are kept moderate.
For a lighter option, consider smaller slices, reduced sugar, lighter cream cheese, or serving the cheesecake with fresh berries instead of a sugary sauce.
Does Classic Creamy Cheesecake Fit a High-Protein Lifestyle?
Classic cheesecake is moderately protein-friendly rather than naturally high-protein. Each slice provides approximately 7g of protein and 30g net carbs, with most carbohydrates coming from the graham crust and sugar. Cream cheese and eggs contribute the main protein. For a higher-protein version, replace part of the cream cheese with Greek yogurt or blended cottage cheese.
Why This Recipe Is Special
- Ultra-creamy center: Gentle baking creates a smooth, luxurious texture.
- Buttery crust: The crisp graham cracker base contrasts beautifully with the creamy filling.
- Balanced flavor: Lemon and cream cheese provide a subtle tang against the sweetness.
- Versatile dessert: Add berries, chocolate, caramel, or fruit sauce.
- Make-ahead friendly: Chilling overnight gives the cheesecake an even better texture.
My Personal Experience
- Use room-temperature ingredients.
Soft cream cheese combines much more smoothly with the other ingredients.
This helps create a creamy filling without stubborn lumps. - Mix the eggs gently.
Overmixing after adding eggs can incorporate too much air.
Keeping the batter smooth and low in air helps reduce cracking. - Watch the center carefully.
The edges should look set while the center still has a gentle wobble.
The cheesecake continues setting as it cools and chills. - Give it plenty of chilling time.
Cheesecake needs several hours in the refrigerator to fully firm up.
Overnight chilling produces the best dense, creamy texture.
Perfect For
This cheesecake is ideal for birthdays, holidays, dinner parties, Valentine’s Day, Mother’s Day, family gatherings, potlucks, afternoon desserts, celebrations, and special weekend baking. Because it can be made a day ahead, it is especially convenient for entertaining.
Why You’ll Love This Recipe
- Rich and creamy: The filling has an irresistibly smooth, velvety texture.
- Simple ingredients: You only need familiar baking staples.
- Beautiful presentation: Fresh berries instantly make it look elegant.
- Easy to customize: Add lemon, chocolate, caramel, or fruit toppings.
- Make-ahead friendly: Overnight chilling improves the texture and flavor.
- Perfect for celebrations: One cheesecake creates generous portions for sharing.
Common Mistakes to Avoid
- Using cold cream cheese: This can leave lumps in the filling.
- Overmixing: Too much air can contribute to cracks.
- Overbaking: A cheesecake that is completely firm in the oven may become dry.
- Skipping gradual cooling: Sudden temperature changes can encourage cracking.
- Cutting it too soon: The cheesecake needs time to chill and fully set.
Required Equipment
- 9-inch springform pan — Makes releasing the finished cheesecake clean and easy.
- Electric mixer — Creates a smooth, lump-free cream cheese filling.
- Large mixing bowl — Provides enough space for combining the filling.
- Rubber spatula — Scrapes the bowl and helps smooth the batter.
- Measuring cups and spoons — Keeps ingredient proportions accurate.
- Roasting pan — Useful for creating an optional water bath.
Storage Instructions
Store leftover cheesecake covered in the refrigerator for up to 5 days. An airtight cake container or tightly covered springform pan helps prevent the cheesecake from absorbing refrigerator odors.
For longer storage, cut the cheesecake into individual slices, wrap each slice tightly, and freeze for up to 2 months. Thaw overnight in the refrigerator before serving.
Recipe Details
- Preparation Time: 25 minutes
- Baking Time: 55–70 minutes
- Cooling Time: 1 hour
- Chilling Time: 6 hours or overnight
- Total Time: Approximately 8 hours
- Servings: 12
- Course: Dessert
- Cuisine: American-inspired
- Best Season: All-season
- Calories: Approximately 390 kcal per slice
- Protein: Approximately 7g per slice
Short 3-Line Description
Classic Creamy Cheesecake combines a buttery graham cracker crust with a rich, smooth cream cheese filling.
A touch of lemon adds bright balance to the sweet, velvety center.
Serve it chilled with fresh berries or your favorite dessert topping for an elegant finish.
📝 Ingredients
For the Crust
- 2 cups graham cracker crumbs
- ¼ cup granulated sugar
- ½ cup (113g) unsalted butter, melted
- ¼ teaspoon salt
For the Cheesecake Filling
- 32 oz (900g) full-fat cream cheese, softened
- 1 cup granulated sugar
- 1 tablespoon cornstarch
- 1 teaspoon vanilla extract
- 1 tablespoon fresh lemon juice
- 4 large eggs, room temperature
- ½ cup sour cream, room temperature
Optional Toppings
- Fresh strawberries
- Blueberries
- Raspberries
- Strawberry sauce
- Chocolate sauce
- Caramel sauce
- Powdered sugar
Directions
- Preheat the oven: Set the oven to 325°F (165°C).
- Prepare the pan: Lightly grease a 9-inch springform pan.
- Make the crust: Combine graham cracker crumbs, sugar, and salt in a bowl.
- Add butter: Pour in the melted butter and stir until the mixture resembles wet sand.
- Press the crust: Firmly press the mixture evenly into the bottom of the springform pan.
- Bake the crust: Bake for 8–10 minutes, then remove and let cool.
- Prepare the cream cheese: Place softened cream cheese in a large mixing bowl.
- Beat gently: Mix on medium-low speed until smooth and creamy.
- Add sugar: Gradually mix in the sugar.
- Add cornstarch: Blend in the cornstarch until incorporated.
- Add flavor: Mix in vanilla and fresh lemon juice.
- Add sour cream: Stir in the sour cream until smooth.
- Add eggs: Add the eggs one at a time, mixing gently after each addition.
- Avoid overmixing: Stop mixing as soon as the filling becomes smooth and uniform.
- Fill the pan: Pour the cheesecake filling over the cooled crust.
- Smooth the surface: Use a spatula to gently level the top.
- Remove bubbles: Tap the pan lightly against the counter a few times.
- Optional water bath: Place the springform pan inside a larger roasting pan and carefully add hot water around it without getting water into the cheesecake.
- Bake: Bake for 55–70 minutes.
- Check the texture: The edges should be set while the center should still have a slight wobble.
- Turn off the oven: Once done, turn off the oven.
- Cool gradually: Leave the cheesecake inside the turned-off oven with the door slightly open for approximately 30 minutes.
- Cool at room temperature: Remove the cheesecake and allow it to cool for approximately 1 hour.
- Refrigerate: Cover and refrigerate for at least 6 hours, preferably overnight.
- Release: Carefully remove the springform ring.
- Slice: Dip a sharp knife in hot water, dry it, and slice the cheesecake.
- Clean the knife: Wipe and rewarm the knife between cuts for neat slices.
- Garnish: Add fresh berries or your preferred topping.
- Serve: Enjoy chilled.
High-Protein Cooking Tips
For a more protein-friendly cheesecake, replace part of the cream cheese with thick plain Greek yogurt or blended cottage cheese. These swaps can increase protein while keeping the filling creamy.
You can also serve each slice with plain Greek yogurt and fresh berries. For a lower-carb version, consider an almond-flour crust and an appropriate sugar alternative, keeping in mind that substitutions may change the texture.
Nutrition Facts (Per Serving – Approximate)
Based on 12 servings with the standard crust.
- Calories: ~390 kcal
- Total Fat: ~27g
- Saturated Fat: ~15g
- Cholesterol: ~125mg
- Sodium: ~350mg
- Potassium: ~160mg
- Total Carbohydrates: ~31g
- Fiber: ~1g
- Net Carbs: ~30g
- Sugars: ~22g
- Protein: ~7g
- Calcium: Varies by cream cheese and sour cream brands
Nutrition values are approximate and depend on the exact ingredients and brands used.
Notes
- Room-temperature ingredients: Essential for a smooth, lump-free filling.
- Full-fat cream cheese: Provides the richest and creamiest texture.
- Water bath: Optional, but it helps maintain gentle, even heat.
- Don’t overbake: A slight center wobble is desirable.
- Chilling: Overnight refrigeration produces the best texture.
- Storage: Refrigerate covered for up to 5 days.
- Freezing: Freeze individual wrapped slices for up to 2 months.
- Serving: Use a warm, clean knife for neat slices.
- Reheating: Cheesecake is best served chilled or slightly softened at room temperature; it does not need reheating.
- Allergy note: Contains dairy, eggs, and wheat/gluten from the graham cracker crust.
- Flavor boost: Add lemon zest, fresh berries, chocolate drizzle, or a fruit sauce before serving.
Frequently Asked Questions
1. Why did my cheesecake crack?
Overmixing, overbaking, or rapid temperature changes can contribute to cracks, so mix gently and cool the cheesecake gradually.
2. How do I know when cheesecake is done?
The edges should be set while the center still has a gentle wobble.
3. Do I have to use a water bath?
No, but a water bath can provide more even heat and help create a smoother cheesecake.
4. Can I use Greek yogurt instead of sour cream?
Yes, plain Greek yogurt works well and makes the cheesecake somewhat more protein-friendly.
5. Why does cheesecake need to chill overnight?
Chilling allows the filling to fully set and develops its characteristic dense, creamy texture.
6. Can I freeze cheesecake?
Yes, individual slices can be wrapped tightly and frozen for up to 2 months.