Silky • Tangy • Eggless • Dairy-Free Dessert
This mousse is built using whipped coconut cream and citrus stabilization, giving a texture similar to classic mousse without eggs or dairy.
🍽️ Yield & Time
- Servings: 4–6 cups
- Prep time: 20–25 minutes
- Chill time: 2–4 hours (important)
- Difficulty: Medium
🧾 Ingredients
🥥 Cream Base
- 1 can (400 ml) full-fat coconut milk, chilled overnight
- OR 1½ cups thick coconut cream
🍋 Lemon Flavor
- ¼ cup fresh lemon juice (about 2–3 lemons)
- 1 tablespoon lemon zest (very important for strong flavor)
- ⅓ to ½ cup powdered sugar or maple syrup (adjust to taste)
🧁 Stabilizers
- 1 teaspoon cornstarch OR 1½ teaspoons agar-agar powder (for firmer set)
- 1 teaspoon vanilla extract
- Pinch of salt
🌿 Optional Enhancers
- 2 tablespoons aquafaba (for extra fluffiness)
- Vegan whipped topping (optional fold-in)
- Crushed biscuits or granola for layering
👨🍳 Step-by-Step Instructions (Very Detailed)
STEP 1: Chill Everything Properly (CRITICAL)
- Place coconut milk in fridge overnight
- Chill mixing bowl and beaters for 15 minutes
Why this matters:
Cold fat = stable whipped texture
Warm coconut milk = will not whip properly
STEP 2: Separate Coconut Cream
- Open chilled can carefully
- Scoop out solid cream only (top layer)
- Leave watery liquid behind (or save for smoothies)
Target:
You need thick, butter-like coconut cream
STEP 3: Whip the Coconut Cream
Using a mixer:
- Whip coconut cream for 2–4 minutes
Texture goal:
- Light
- Fluffy
- Similar to whipped cream
Fixes:
- Too soft → chill 10–15 min and whip again
- Not whipping → cream not cold enough
STEP 4: Add Sweetness & Flavor
Add:
- Powdered sugar or maple syrup
- Vanilla extract
- Lemon zest
- Pinch of salt
Whip again for 1 minute.
Flavor check:
It should taste:
- Sweet
- Bright
- Strong lemon aroma
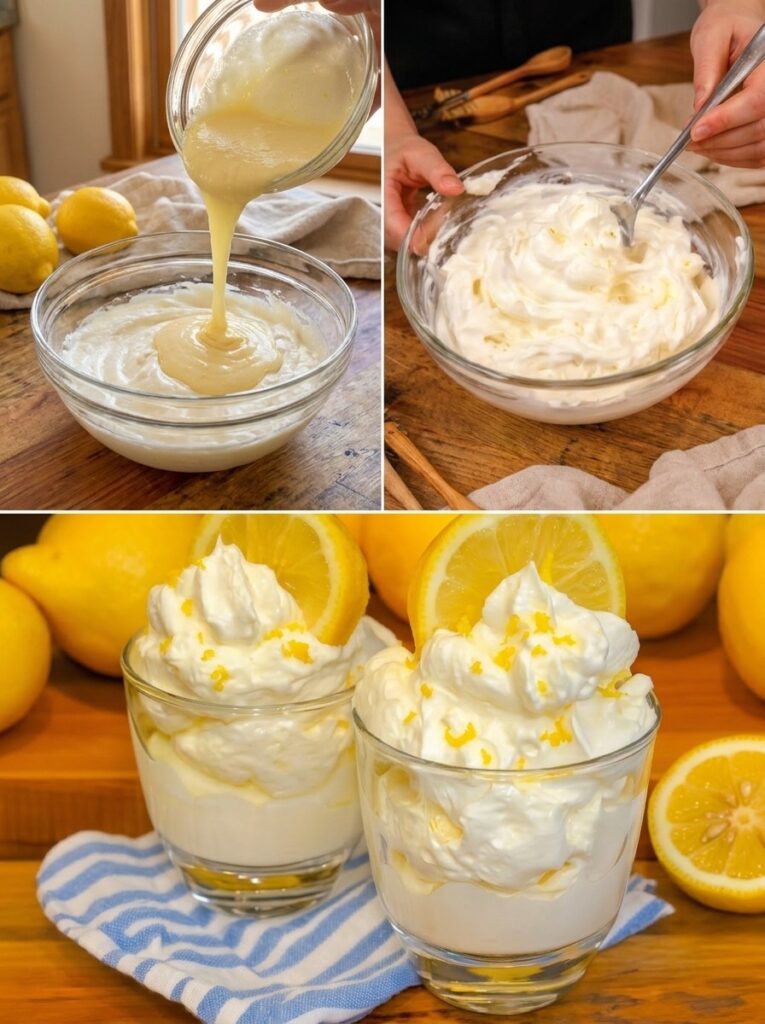
STEP 5: Add Lemon Juice (Carefully)
Slowly pour in lemon juice while mixing on LOW speed.
Important:
- Add gradually to prevent curdling
- Lemon thickens mixture slightly
If using agar-agar:
- Dissolve it in 2 tbsp warm water first
- Then mix into lemon juice before adding
STEP 6: Stabilize Texture
Choose one:
Option A (Soft mousse)
- No extra stabilizer needed
- Chill only
Option B (Firm mousse)
- Add dissolved agar-agar mixture
- Mix quickly before it sets
STEP 7: Optional Air Boost (Extra Light Texture)
For ultra-fluffy mousse:
- Whip 2 tablespoons aquafaba separately until foamy
- Gently fold into mousse using spatula
Folding technique:
- Do NOT stir hard
- Use slow “lift and fold” motion
STEP 8: Assemble & Portion
Spoon into serving cups:
Layering idea (optional):
- Crushed biscuits base
- Lemon mousse
- Lemon zest topping
STEP 9: Chill
Refrigerate:
- Minimum: 2 hours
- Best: 4 hours
What happens:
- Mousse firms up
- Flavors deepen
- Texture becomes airy and stable
🍽️ Final Texture Profile
Perfect vegan lemon mousse should be:
- Light and airy
- Creamy but not dense
- Bright, tangy lemon flavor
- Slightly spoonable but holds shape
🧠 Troubleshooting
❌ Too runny
- Not enough coconut cream
- Fix: chill longer or add agar-agar
❌ Too heavy
- Overmixed or too dense coconut cream
- Fix: fold in aquafaba
❌ Bitter taste
- Too much lemon zest (use fine zest only)
❌ Not fluffy
- Coconut cream not cold enough
💪 Nutrition (approx per serving)
- Calories: 180–260
- Fat: 15–22 g
- Carbs: 10–18 g
- Protein: 1–3 g
🍋 Variations
🍓 Lemon Berry Mousse
Fold in crushed strawberries or blueberries
🍪 Lemon Cheesecake Mousse
Add vegan cream cheese alternative
🍫 Lemon White Chocolate Mousse
Add melted vegan white chocolate
🌿 Extra Tangy Version
Increase lemon juice + add lime zest