Description
VIDEO
Join Our Free Facebook Group
Ready, set, go! Get delicious new recipes, time-saving tips and reader favorites in your feed — completely free.
Join the Group
×
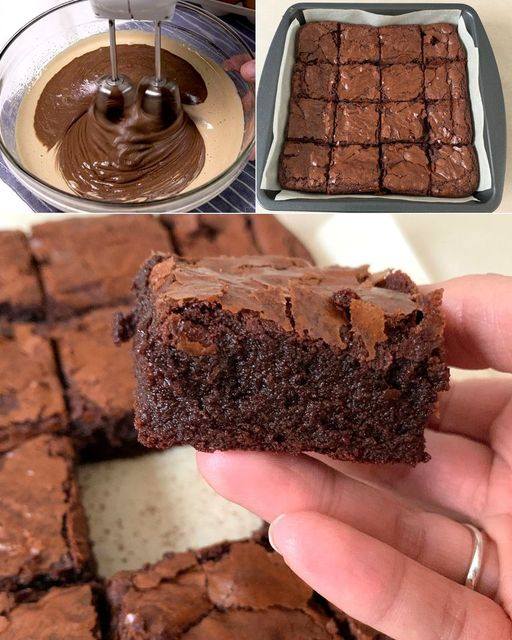
These vegan sweet potato brownies are incredibly rich, fudgy, and chocolatey, with mashed sweet potato providing natural sweetness, moisture, and a soft, dense texture. Unlike traditional brownies that rely on eggs and butter, these brownies use sweet potato as the primary binding and moistening ingredient, creating a healthier dessert that remains indulgent and satisfying.
The result is a brownie with a crackly top, a deep chocolate flavor, and a melt-in-your-mouth fudgy center. They’re perfect for dessert, snacks, lunchboxes, or special occasions.
Yield
VIDEO
Join Our Free Facebook Group
Ready, set, go! Get delicious new recipes, time-saving tips and reader favorites in your feed — completely free.
Join the Group
×
Preparation Time
VIDEO
Join Our Free Facebook Group
Ready, set, go! Get delicious new recipes, time-saving tips and reader favorites in your feed — completely free.
Join the Group
×
Sweet potato preparation: 20 minutes
Batter preparation: 15 minutes
Baking time: 25–30 minutes
Total Time
VIDEO
Join Our Free Facebook Group
Ready, set, go! Get delicious new recipes, time-saving tips and reader favorites in your feed — completely free.
Join the Group
×
Approximately 1 hour
Ingredients
Join Our Free Facebook Group
Ready, set, go! Get delicious new recipes, time-saving tips and reader favorites in your feed — completely free.
Join the Group
×
For the Brownies
VIDEO
Join Our Free Facebook Group
Ready, set, go! Get delicious new recipes, time-saving tips and reader favorites in your feed — completely free.
Join the Group
×
2 cups (450 g) mashed Sweet Potato (about 2 medium sweet potatoes)
½ cup (120 ml) maple syrup
¼ cup (60 ml) plant-based milk (almond, oat, or soy)
¼ cup (60 ml) melted coconut oil
1 teaspoon vanilla extract
¾ cup (75 g) unsweetened cocoa powder
1 cup (120 g) all-purpose flour
1 teaspoon baking powder
¼ teaspoon salt
Optional Add-Ins
VIDEO
Join Our Free Facebook Group
Ready, set, go! Get delicious new recipes, time-saving tips and reader favorites in your feed — completely free.
Join the Group
×
½ cup vegan chocolate chips
½ cup chopped walnuts or pecans
2 tablespoons espresso powder (enhances chocolate flavor)
¼ teaspoon cinnamon
Equipment
Join Our Free Facebook Group
Ready, set, go! Get delicious new recipes, time-saving tips and reader favorites in your feed — completely free.
Join the Group
×
8-inch (20 cm) square baking pan
Parchment paper
Mixing bowls
Potato masher or food processor
Whisk
Rubber spatula
Step 1: Prepare the Sweet Potatoes
Join Our Free Facebook Group
Ready, set, go! Get delicious new recipes, time-saving tips and reader favorites in your feed — completely free.
Join the Group
×
Option A: Roast (Recommended)
VIDEO
Join Our Free Facebook Group
Ready, set, go! Get delicious new recipes, time-saving tips and reader favorites in your feed — completely free.
Join the Group
×
Preheat oven to:
200°C (400°F)
Wash the sweet potatoes thoroughly.
Pierce each several times with a fork.
Place on a baking tray.
Roast for:
45–60 minutes
until completely tender.
Why Roast?
Join Our Free Facebook Group
Ready, set, go! Get delicious new recipes, time-saving tips and reader favorites in your feed — completely free.
Join the Group
×
Roasting concentrates natural sugars and produces a richer flavor than boiling.
Option B: Steam
VIDEO
Join Our Free Facebook Group
Ready, set, go! Get delicious new recipes, time-saving tips and reader favorites in your feed — completely free.
Join the Group
×
Peel and cube sweet potatoes.
Steam for:
15–20 minutes
until fork-tender.
Allow to cool slightly.
Step 2: Mash the Sweet Potatoes
Join Our Free Facebook Group
Ready, set, go! Get delicious new recipes, time-saving tips and reader favorites in your feed — completely free.
Join the Group
×
Remove skins if roasted.
Transfer flesh to a bowl.
Mash until completely smooth.
Important
Join Our Free Facebook Group
Ready, set, go! Get delicious new recipes, time-saving tips and reader favorites in your feed — completely free.
Join the Group
×
The smoother the sweet potato, the fudgier and more uniform the brownies will be.
For an ultra-smooth texture, use a food processor.
Measure exactly:
2 cups (450 g) mashed sweet potato
Step 3: Prepare the Baking Pan
Join Our Free Facebook Group
Ready, set, go! Get delicious new recipes, time-saving tips and reader favorites in your feed — completely free.
Join the Group
×
Line an 8-inch square baking pan with parchment paper.
Leave some overhang on the sides.
Lightly grease the paper if desired.
Why?
Join Our Free Facebook Group
Ready, set, go! Get delicious new recipes, time-saving tips and reader favorites in your feed — completely free.
Join the Group
×
The parchment allows easy removal and cleaner slices.
Step 4: Mix the Wet Ingredients
Join Our Free Facebook Group
Ready, set, go! Get delicious new recipes, time-saving tips and reader favorites in your feed — completely free.
Join the Group
×
In a large mixing bowl combine:
Mashed sweet potato
Maple syrup
Plant-based milk
Melted coconut oil
Vanilla extract
Whisk until smooth and creamy.
Desired Texture
Join Our Free Facebook Group
Ready, set, go! Get delicious new recipes, time-saving tips and reader favorites in your feed — completely free.
Join the Group
×
The mixture should be thick, silky, and evenly blended.
Step 5: Combine the Dry Ingredients
Join Our Free Facebook Group
Ready, set, go! Get delicious new recipes, time-saving tips and reader favorites in your feed — completely free.
Join the Group
×
In a separate bowl whisk together:
Cocoa powder
Flour
Baking powder
Salt
Why Mix Separately?
Join Our Free Facebook Group
Ready, set, go! Get delicious new recipes, time-saving tips and reader favorites in your feed — completely free.
Join the Group
×
This ensures even distribution of the leavening agent and prevents lumps of cocoa.
Step 6: Make the Batter
Join Our Free Facebook Group
Ready, set, go! Get delicious new recipes, time-saving tips and reader favorites in your feed — completely free.
Join the Group
×
Gradually add the dry ingredients to the wet mixture.
Fold gently with a spatula.
Mix only until no dry flour remains.
What the Batter Should Look Like
Join Our Free Facebook Group
Ready, set, go! Get delicious new recipes, time-saving tips and reader favorites in your feed — completely free.
Join the Group
×
The batter will be:
✓ Thick
✓ Dense
✓ Glossy
✓ Similar to traditional brownie batter
Do not overmix, as this can make the brownies less tender.
Step 7: Add Optional Mix-Ins
Join Our Free Facebook Group
Ready, set, go! Get delicious new recipes, time-saving tips and reader favorites in your feed — completely free.
Join the Group
×
Fold in:
Vegan chocolate chips
Nuts
Espresso powder
Cinnamon
if using.
Flavor Tip
Join Our Free Facebook Group
Ready, set, go! Get delicious new recipes, time-saving tips and reader favorites in your feed — completely free.
Join the Group
×
Chocolate chips create pockets of melted chocolate throughout the brownies.
Step 8: Transfer to the Pan
Join Our Free Facebook Group
Ready, set, go! Get delicious new recipes, time-saving tips and reader favorites in your feed — completely free.
Join the Group
×
Spread the batter into the prepared pan.
Use a spatula to level the surface.
Tap the pan gently on the counter to remove large air pockets.
Step 9: Bake
Join Our Free Facebook Group
Ready, set, go! Get delicious new recipes, time-saving tips and reader favorites in your feed — completely free.
Join the Group
×
Preheat oven to:
175°C (350°F)
Bake for:
25–30 minutes
How to Tell When They’re Done
Join Our Free Facebook Group
Ready, set, go! Get delicious new recipes, time-saving tips and reader favorites in your feed — completely free.
Join the Group
×
The edges should appear set.
The center should still be slightly soft.
A toothpick inserted into the center should come out with a few moist crumbs attached.
Avoid Overbaking
Join Our Free Facebook Group
Ready, set, go! Get delicious new recipes, time-saving tips and reader favorites in your feed — completely free.
Join the Group
×
Overbaked brownies lose their fudgy texture and become cakier.
Step 10: Cool Completely
Join Our Free Facebook Group
Ready, set, go! Get delicious new recipes, time-saving tips and reader favorites in your feed — completely free.
Join the Group
×
Place the pan on a wire rack.
Cool for at least:
45–60 minutes
Why This Matters
Join Our Free Facebook Group
Ready, set, go! Get delicious new recipes, time-saving tips and reader favorites in your feed — completely free.
Join the Group
×
Brownies continue setting as they cool.
Cutting too early can cause them to crumble.
Step 11: Slice
Join Our Free Facebook Group
Ready, set, go! Get delicious new recipes, time-saving tips and reader favorites in your feed — completely free.
Join the Group
×
Lift brownies out using the parchment overhang.
Place on a cutting board.
Use a sharp knife to cut into 12 squares.
For cleaner cuts:
Wipe the knife after each slice.
Chill brownies for 20 minutes before cutting.
Optional Chocolate Glaze
Join Our Free Facebook Group
Ready, set, go! Get delicious new recipes, time-saving tips and reader favorites in your feed — completely free.
Join the Group
×
Ingredients
VIDEO
Join Our Free Facebook Group
Ready, set, go! Get delicious new recipes, time-saving tips and reader favorites in your feed — completely free.
Join the Group
×
½ cup vegan chocolate chips
2 tablespoons plant-based milk
Method
VIDEO
Join Our Free Facebook Group
Ready, set, go! Get delicious new recipes, time-saving tips and reader favorites in your feed — completely free.
Join the Group
×
Place ingredients in a heatproof bowl.
Microwave in short intervals or melt over simmering water.
Stir until smooth.
Drizzle over cooled brownies.
Allow glaze to set before slicing.
Storage
Join Our Free Facebook Group
Ready, set, go! Get delicious new recipes, time-saving tips and reader favorites in your feed — completely free.
Join the Group
×
Room Temperature
VIDEO
Join Our Free Facebook Group
Ready, set, go! Get delicious new recipes, time-saving tips and reader favorites in your feed — completely free.
Join the Group
×
Store in an airtight container for up to 3 days.
Refrigerator
VIDEO
Join Our Free Facebook Group
Ready, set, go! Get delicious new recipes, time-saving tips and reader favorites in your feed — completely free.
Join the Group
×
Store for up to 1 week.
The brownies become even fudgier after chilling.
Freezer
VIDEO
Join Our Free Facebook Group
Ready, set, go! Get delicious new recipes, time-saving tips and reader favorites in your feed — completely free.
Join the Group
×
Freeze individually wrapped brownies for up to 3 months.
Thaw overnight in the refrigerator before serving.
Variations
Join Our Free Facebook Group
Ready, set, go! Get delicious new recipes, time-saving tips and reader favorites in your feed — completely free.
Join the Group
×
Peanut Butter Swirl
Join Our Free Facebook Group
Ready, set, go! Get delicious new recipes, time-saving tips and reader favorites in your feed — completely free.
Join the Group
×
Drop spoonfuls of natural peanut butter onto the batter and swirl with a knife.
Double Chocolate
Join Our Free Facebook Group
Ready, set, go! Get delicious new recipes, time-saving tips and reader favorites in your feed — completely free.
Join the Group
×
Add an extra ½ cup vegan chocolate chips.
Nutty Brownies
Join Our Free Facebook Group
Ready, set, go! Get delicious new recipes, time-saving tips and reader favorites in your feed — completely free.
Join the Group
×
Add chopped walnuts or pecans for crunch.
Mocha Brownies
Join Our Free Facebook Group
Ready, set, go! Get delicious new recipes, time-saving tips and reader favorites in your feed — completely free.
Join the Group
×
Add 1 tablespoon espresso powder to intensify the chocolate flavor.