Soft inside, crispy outside, cheesy-garlicky flavor—no yeast, no complicated steps.
🧾 What makes this recipe special
- Only 3 main ingredients
- High-protein (thanks to cottage cheese)
- No yeast, no long proofing
- Quick bake or air-fry option
- Crispy edges + soft center
🛒 Ingredients (3 main + optional upgrades)
⭐ Core ingredients
- 1 cup cottage cheese (drained well)
→ Best texture comes from thick, low-moisture cottage cheese - 1 cup all-purpose flour
→ Forms structure for breadstick dough - 1 tsp baking powder
→ Helps lightness + slight puff
🧄 Garlic topping (highly recommended even if “3-ingredient base”)
- 2 tbsp olive oil or melted butter
- 2–3 garlic cloves (finely minced or grated)
- Pinch of salt
🌿 Optional upgrades (not required but improve flavor)
- 1–2 tbsp grated parmesan (or vegan alternative)
- ½ tsp oregano or Italian seasoning
- Chili flakes
- Mozzarella for stuffing or topping
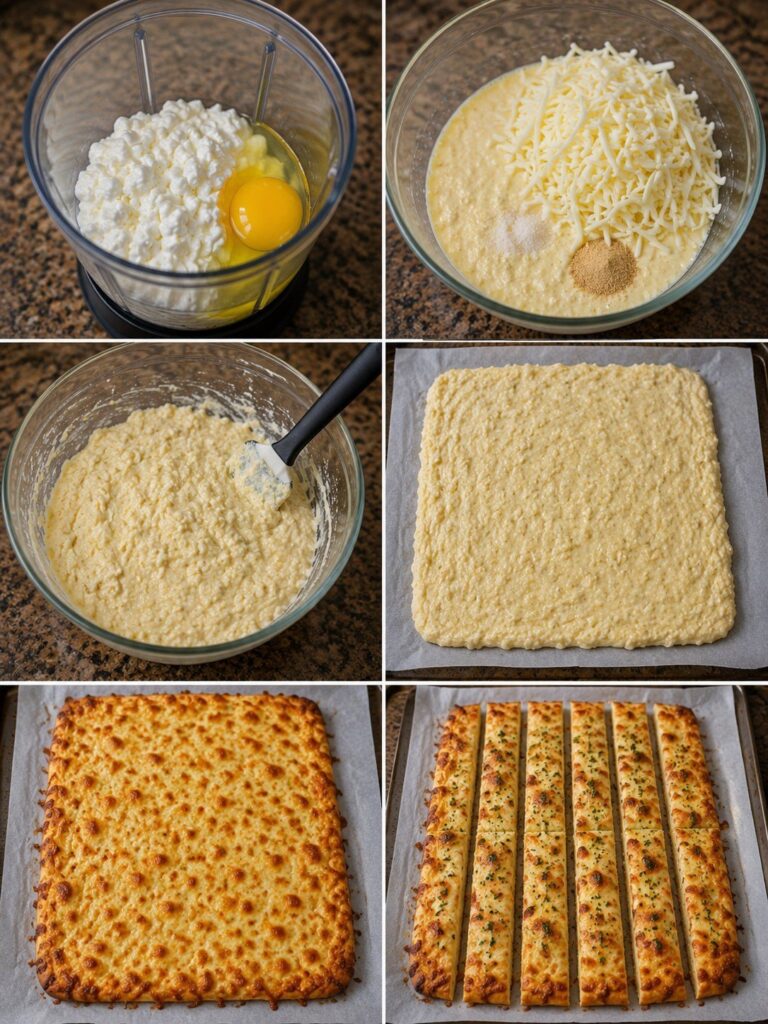
👩🍳 Step-by-step Instructions (very detailed)
🥣 Step 1: Prep cottage cheese (important for crisp texture)
If your cottage cheese is watery:
- Drain using a sieve or cheesecloth for 5–10 minutes
Why this matters:
Too much moisture = soggy dough
🧪 Step 2: Make the dough
In a bowl mix:
- cottage cheese
- flour
- baking powder
Mix method:
- Start with spoon
- Then use hands to form dough
Dough texture goal:
- Soft
- Slightly sticky but manageable
- Not runny
- Not dry/crumbly
👉 If too sticky → add 1–2 tbsp flour
👉 If too dry → add 1 tsp water or extra cottage cheese
⏳ Step 3: Rest the dough (optional but helpful)
Let dough rest 10–15 minutes
Why:
- Hydrates flour
- Makes rolling easier
- Improves final texture
🔪 Step 4: Shape the breadsticks
You have two methods:
Option A: Classic sticks
- Roll dough into rectangle (½ inch thick)
- Cut into strips
Option B: Rustic twist sticks
- Roll into ropes
- Twist gently for bakery-style look
🔥 Step 5: Preheat oven
Set to:
- 200°C (390°F)
Line baking tray with parchment paper.
🧄 Step 6: Garlic topping preparation
Mix:
- olive oil or melted butter
- minced garlic
- pinch of salt
Brush generously over each breadstick.
👉 This is what creates that crispy golden garlic crust.
🔥 Step 7: Bake
Bake for:
- 15–20 minutes
What to look for:
- golden brown edges
- slightly puffed texture
- crispy surface
👉 For extra crispiness: bake 2–3 minutes longer
🧈 Step 8: Final garlic brush (secret step)
Right after baking:
- brush again with garlic butter/oil
- optionally sprinkle herbs or chili flakes
Why:
Hot breadsticks absorb flavor better = stronger garlic taste
🧠 Texture Guide
Soft inside + crispy outside:
- normal bake time
- medium thickness dough
Extra crispy:
- roll thinner
- bake slightly longer
- use less moisture in dough
More fluffy:
- slightly thicker sticks
- add extra baking powder (¼ tsp more)
⚠️ Common mistakes
❌ Dough too sticky
→ cottage cheese not drained properly
❌ Breadsticks too dense
→ overmixed dough or too much flour
❌ Not crispy
→ oven too low or underbaked
❌ Burning garlic
→ garlic added too early without oil protection
🌿 Variations
🧀 Cheesy version
Add shredded mozzarella or parmesan on top
🌶 Spicy version
Add chili flakes + paprika to garlic butter
🌿 Herb version
Add oregano, basil, thyme
🧄 Extra garlic version
Add roasted garlic into dough + topping
🧊 Storage
- Room temp: 1 day (best fresh)
- Fridge: 2–3 days
- Reheat: 180°C for 5–7 minutes (restores crispness)
🍽️ Serving ideas
- Marinara dip
- Vegan ranch
- Hummus
- Garlic yogurt dip